Shopping cart is empty
 
English Polski Spanish 
Search For a Manual
 

(e.g. AA-V20EG JVC, ZX-7 Sony )
PayPal 1000+ rating Secure, Encrypted Checkout.
 
Categories
Information
Featured Product
Home >> IGNIS >> AKL 378/01 IX Owner's Manual
 
 0 item(s) in your cart 

IGNIS AKL 378/01 IX
Owner's Manual


Tweet about this product and get $1.00 of store credit for instant use!
  • Download
  • PDF Format
  • Complete manual
  • Language: English, German, French, Italian, Spanish, Dutch, Portuguese, Greek
Price: $4.99

Description of IGNIS AKL 378/01 IX Owner's Manual

Complete owner's manual in digital format. The manual will be available for download as PDF file after You purchase it.

Owner's Manual ( sometimes referred to as User's Guide or User's Manual ) contains information on how to use Your device. After placing order we'll send You download instructions on Your email address.

The manual is available in languages: English, German, French, Italian, Spanish, Dutch, Portuguese, Greek

Not yet ready
You must purchase it first

Customer Reviews
There are currently no product reviews.
Other Reviews
 SX-PR100 TECHNICS Owner's Manual by Bob Anderson;
This manual covers the main equipment features only. While it also includes the procedure for saving and loading from the now long obsolete memory cards it does not mention the how to operate with the optional floppy drive interface so I am still at a loss about how to use this! Note that there is a separate manual covering the MIDI interface and programming via the keyboard, not included in this download. You will also need to get hold of this if you want to use the MIDI interface properly. Basically there is little difference between this manual and the free to download manual for the similar PR60 model.
 VSX455 PIONEER Owner's Manual by Gilberto Araujo;
Good list of manuals. I found a very rare one and easily get. Should be promptly to download, as we must to wait hours even after confirmed payment.
 PM488AV MARANTZ Owner's Manual by Roger Jove;
The manual was properly scanned and perfectly readable. The only small problem is that I couldn't use my dear Ctrl + F to find a word I needed.
 WAE 15000 BAUKNECHT Owner's Manual by Peter Krejci;
Nothing wrong with the manual or the delivery - came to me the same day I ordered it. But afterwards I realized that I ordered the wrong manual. Probably better with the Quick start - version. So maybe it would be better if we could see a list with inhold for each manual before ordering?
 T4850 ONKYO Owner's Manual by Ronald Morssink;
Bought T4850 High End Tuner a few years ago, but i didn't know where all the buttons were used for. So i purchased the owners manual. Perfect! Just what i needed.

Text excerpt from page 2 (click to view)
1de59055.fm5 Page 4 Monday, November 11, 2002 5:30 PM

VOR DEM VERWENDEN DER GLASKERAMIK-KOCHMULDE
� Lesen Sie bitte die Bedienungsanleitung aufmerksam durch, um maximalen Nutzen aus Ihrem Gerät zu ziehen, und heben Sie sie danach gut auf.

INSTALLATION
Kochmulde
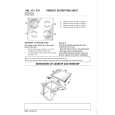
� Die Kochmulde in eine Arbeitsplatte mit einer Dicke von 20 - 50 mm einsetzen. Zwischen Kochmulde und Backofen darf nichts eingefügt werden (z. B. Querstreben/Zierleisten o.ä.). � Ein eventueller Hochschrank muss vom Rand der Kochmulde mindestens 100 mm entfernt sein. � Der Ausschnitt in der Arbeitsplatte ist gemä� den Abmessungen in der separaten Produktbeschreibung für die Kochmulde vorzunehmen. Wichtig: Vor der Installation der Kochmulde die eventuell vorhandene Schutzfolie entfernen. � Besteht die Arbeitsplatte aus Holz, Verwenden Sie die speziell mitgelieferten Befestigungsklammern und Schrauben. 1. Positionieren Sie die 4 Klammern (D) wie in der Abbildung gezeigt, und beachten Sie die angegebenen Ma�e. 2. Die Klammern mit den Schrauben (E) befestigen. 3. Die Kochmulde in die Arbeitsplatte einsetzen. � Besteht die Arbeitsplatte aus Marmor, Plastik, Keramik, Naturstein, usw., muss die Kochmulde mit Haltebügeln (F) befestigt werden, Code 4819 404 78697 (beim Kundendienst anzufragen). 1. Die Kochmulde in die Arbeitsplatte einsetzen. 2. Die 4 Haltebügel (F) in Abhängigkeit von der Dicke der Arbeitsplatte wie in der Abbildung gezeigt befestigen. 3. Die 4 Schrauben (G) sind in den Positionen (H) zu fixieren).

4

You might also want to buy

$4.99

AKL 378/01 IX IGNIS
Quick Start

Quick start guide ( sometimes called quick guide ) contains most important information on how to use…
>
Parse Time: 0.734 - Number of Queries: 104 - Query Time: 0.279