|
|
|
Categories
|
|
Information
|
|
Featured Product
|
|
|
 |
|
|
There are currently no product reviews.
 ;
Very well done!!!!! congratulations. It was a bit longer than usual the wiating time even if it was on time (in 24 hours).
;
Last week I bought a second hand BAUKNECHT TRK4850 DRYER. It is a professional machine with many programs and switch options. I feared it would be a huge quest to find a manual. I was delighted when I found owner-manuals.com. After payment I received the file to download the next day already. The quality is great. I am very happy. Thanks!
but kindly the distributions of the operating programs not find in the owners manual,can you help me to understand the operating programs instructions thank you
;
Very good copy, very readable and easy transaction as always.
;
It is perfect, exactly what we needed. It's like the paper version but less clutter.
 ;
Received my manual within 24 hours. Very clear scan of the manual I needed. Thanks!
3gb66001.fm5 Page 17 Monday, November 12, 2001 3:00 PM
INSTALLATION
Adjustment to different types of gas
If a different type of gas from the one indicated in the plate is used, the cooking hob must be adapted to it. 1. The gas nozzles must be changed by After-Sales Service or a qualified technician. Nozzles not supplied with the appliance must be ordered from After-Sales Service. 2. Connect the cooking hob to the gas shut-off valve by means of a pipe suitable for the type of gas used, in compliance with current local regulations. 3. Adjust the minimum setting of the taps. Note: when liquid petroleum gas is used (G 30/G 31), the minimum gas setting screws must be tightened as far as they will go.
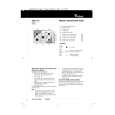
Replacing the injectors (see table in enclosed product description sheet)
1. Remove grids �A�. 2. Extract burners �B�. 3. Using a socket spanner of the appropriate size, �C�, unscrew the injector to be replaced. 4. Replace it with the injector suitable for the new type of gas. 5. Re-assemble the injector in �D�. 6. For models equipped with a triple crown burner, proceed as shown in figure. � Remove the two screws �F� followed by the cap �G� then replace both injectors �D� as previously described. Replace the cap �G�, ensuring the seal is properly positioned before attempting to use the cooktop. 7. Before installing the cooktop, remember to affix the gas calibration plate supplied with the injectors in such a way that it covers the existing information relating to gas calibration.
Adjusting minimum gas setting of taps
To ensure that the minimum setting is correctly adjusted, remove knob �E� and proceed as follows: � tighten (-) to reduce the height of the flame; � loosen (+) to increase the height of the flame. The adjustment must be performed with the tap in minimum gas setting position (small flame) .
17
|
|
|
> |
|