|
|
|
Categories
|
|
Information
|
|
Featured Product
|
|
|
 |
|
|
There are currently no product reviews.
 ;
Awesome quality manual. You really saved my bacon with this one. Was looking for some specific information with regards to my "new" vintage VCR that didn't come with the owners manual. This site is truely a goldmine of available manuals. The quality of the scans are top notch.
Thank-you so much for this awesome manual. If you're looking for this Sony SL-HF400 owners manual, this is the one you NEED to buy. Definitely worth the money.
;
The manual was made available promptly. I is a clean scan of the original. I had no problem downloading it. The scan was well centered and cleanly formatted. It is as good a product as can be had without being the original document.
 ;
Received downlink in less then 8 hours, Item was in good copy condition, and told me how to program the clock timer. The price was very resonable, and the process was very automated and was GREAT to work with.
;
Fast service, document is OK. Thanks! Searched for it long time.
;
I was very pleased with the manual I got for my amateur (ham) radio. Without it I could not figure out how to input and/or change the P/L setting on my radio. It drove me nuts as the radio was essentially useless. That all changed when my manual came. Then it took only minutes and I was done. Now my radio works fine. This is an exceptionally good resource as it's a very easy and user friendly download. Thank you very much! Dziękujemy za!
3gb53231b.fm5 Page 17 Friday, April 11, 2003 12:21 PM
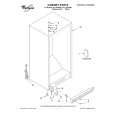
INSTALLATION
Technical information for the Installer
This cooktop can be embedded in a worktop 20 to 50 mm thick. If there is no oven beneath the cooktop (any oven installed must be manufactured by us and equipped with a cooling system), insert a separator panel at a minimum distance of 20 mm from the bottom of the cooktop. Note: before installation, make sure that the local gas delivery conditions (nature and pressure of gas) are compatible with the settings of the cooktop, as indicated on the Product Description Sheet and on the rating plate. � If a vertical piece of furniture is installed, there must be a gap of at least 100 mm between it and the edge of the cooktop. � Before installation, remove the plastic film protecting the appliance, if provided. The outer surfaces of the furniture or appliances adjacent to the cooktop must be heat resistant (heat protection �Y�) according to standards. � Installation must comply with current local regulations. � In the room where the cooktop is installed, there must be enough air to allow the gas to burn correctly (see the separate Product Description Sheet). � The natural flow of air must take place through an adequate opening, that must be: - permanent, made on one of the outside walls of the room, and communicating with the exterior in an area away from sources of pollution; - built so as to ensure that its openings, both on the inside and on the outside, cannot be obstructed, intentionally or accidentally; - protected by a metal grid or mesh that does not reduce its working section; - situated near the floor level and positioned so as not to interfere with the operation of the fume exhaust devices. - The fume exhaust has to take place through an appropriate hood or fan installed on the wall or on the window.
Assembly
� Apply the supplied gasket to the cooktop (if not yet fitted), after having cleaned its surface as shown in the relevant figure. To secure the cooktop, use brackets (A) supplied with it. 1. Fit the brackets into the relevant bores and fasten them by means of their screws. 2. Make an opening in the worktop, respecting the dimensions indicated in the enclosed Product Description Sheet. 3. Install the cooktop in the worktop. Important: the power supply cable and plug must be suitable for the power absorption of the cooktop, and the cable must be long enough to permit its upward extraction.
17
|
|
|
> |
|