|
|
|
Categories
|
|
Information
|
|
Featured Product
|
|
|
 |
|
|
There are currently no product reviews.
 ;
Last week I bought a second hand BAUKNECHT TRK4850 DRYER. It is a professional machine with many programs and switch options. I feared it would be a huge quest to find a manual. I was delighted when I found owner-manuals.com. After payment I received the file to download the next day already. The quality is great. I am very happy. Thanks!
but kindly the distributions of the operating programs not find in the owners manual,can you help me to understand the operating programs instructions thank you
;
Very good copy, very readable and easy transaction as always.
;
It is perfect, exactly what we needed. It's like the paper version but less clutter.
 ;
Received my manual within 24 hours. Very clear scan of the manual I needed. Thanks!
;
Very clear scan, I recommend it. Definitely a must have for any 3362 owner.
Alpine could have written a slightly more complete manual, though. It's already pretty huge, but the unit has so many functions, I feel some more explanation would have been better.
Yamaha's manual of their comparable YDSP-1 is a little better in my opinion.
3gb53661.fm Page 41 Monday, November 25, 2002 12:20 PM
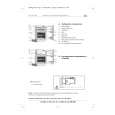
ELECTRICAL CONNECTION
� Make sure the appliance is installed and connected to the electricity supply by a qualified technician in accordance with the manufacturer�s instructions and in compliance with local regulations. � The installer is responsible for the correct electrical connection of the appliance and the observance of the relative safety prescriptions. � The appliance must be connected to the electricity supply by means of an all-pole disconnect switch with minimum contact gap of 3 mm. � The appliance must be earthed by law. � Do not use multiple plug adapters or extension leads. � After the appliance has been installed, the electrical components must be inaccessible. � No liability for damage or injury to persons or property will be accepted from non-observance of these requirements.
Connection and installation
If the cooktop terminals do not correspond to the connection and colour indications on the cooktop/oven connection plate located at the top of the oven, request the adaptor kit, code AMC 874, from the After-sales Service. 1. Install the cooktop in its seat. 2. Connect the four terminals A to the oven terminals B situated in the rear section, paying attention that the correspondence of the coloured plugs is respected. 3. Fasten the cooktop. 4. Install the oven and fix it with the screws supplied. Note If the cooktop must be connected to the separate control panel instead of the oven read the instructions supplied with the control panel.
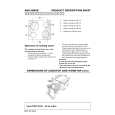
ENERGY SAVING TIPS
� Use pots and pans whose bottom diameter is equal to that of the cooking zone or slightly larger. � Only use flat-bottomed pots and pans. � If possible, keep the pot covered when cooking. � Cook vegetables, potatoes, et. with little water in order to cut down cooking time. � A pressure cooker allows you to save even more energy and time.
PROTECTING THE ENVIRONMENT
1. Packing
The packaging material can be 100% recycled, as confirmed by the recycling symbol .
2. Product
The appliances are built from recyclable materials. If you decide to scrap the appliances act responsibly and observe local waste disposal by laws. Cut off the power cords so that the appliances cannot be connected to the mains.
41
|
|
|
> |
|