|
|
|
Categories
|
|
Information
|
|
Featured Product
|
|
|
 |
|
|
There are currently no product reviews.
 ;
Very well done!!!!! congratulations. It was a bit longer than usual the wiating time even if it was on time (in 24 hours).
;
Last week I bought a second hand BAUKNECHT TRK4850 DRYER. It is a professional machine with many programs and switch options. I feared it would be a huge quest to find a manual. I was delighted when I found owner-manuals.com. After payment I received the file to download the next day already. The quality is great. I am very happy. Thanks!
but kindly the distributions of the operating programs not find in the owners manual,can you help me to understand the operating programs instructions thank you
;
Very good copy, very readable and easy transaction as always.
;
It is perfect, exactly what we needed. It's like the paper version but less clutter.
 ;
Received my manual within 24 hours. Very clear scan of the manual I needed. Thanks!
INSTALACI�N
Recomendaciones
Importante: cualquier operación de instalación o de mantenimiento debe efectuarse con el horno desconectado de la red eléctrica. � El aparato debe ser instalado por un técnico calificado según las instrucciones del fabricante y en conformidad con la normativa local. � Tras desembalar el horno, compruebe que no se haya dañado durante el transporte y que la puerta cierre correctamente. En caso de duda, póngase en contacto con su vendedor o con el Servicio de Asistencia Técnica más cercano. � Tras desembalar el horno, déjelo sobre la base de poliestireno para evitar que pueda dañarse. � Para instalar el horno se recomienda utilizar guantes protectores. � El horno está provisto de dos manillas laterales (B) para facilitar las maniobras de instalación (fig. 7).
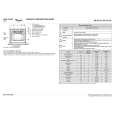
Preparación del mueble para empotrar el horno
â�¢ Los muebles de cocina que estén en contacto directo con el horno han de ser resistentes al calor (80 °C como mÃnimo). â�¢ Si ha de cortar el mueble de cocina o la encimera, hágalo antes de instalar el horno. Quite las virutas de madera o el serrÃn; pueden impedir el correcto funcionamiento del aparato. â�¢ Las medidas de los muebles de cocina en los que se puede instalar el horno se ilustran en las figuras 1, 2 y 3. Las medidas del horno se ilustran en la figura 4. â�¢ Para lograr una ventilación correcta, es necesario dejar un espacio en la parte posterior del mueble con las dimensiones indicadas en la figura. El fondo del horno no ha de quedar accesible una vez efectuada la instalación. â�¢ Al instalar el horno, tenga cuidado de que las paredes del mismo no estén en contacto directo con los muebles adyacentes.
2
3
1
4
15
|
|
|
> |
|