|
There are currently no product reviews.
 ;
The manual was very helpfull, it answerdes all my questions, and i was surprized to find the original manual on this site! Big thumbs uP:)
 ;
helpful manual.good service.Quick response.will use again
;
Speedy confirmation to my order , with elaborate instructions .
Item Email , received immediately as desired by me.
A Pleasant & Satisfying Transaction.
;
I was searching for this manual at last i got it from this web
;
What can i say but i would have been lost without your support.
Thank You!
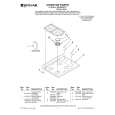
Huomaa: seuraavia toimenpiteitä suoritettaessa on käytettävä suojakäsineitä. Näitä ohjeita on noudatettava sekä henkilövammojen että uunin luukun ja saranoiden vahingoittumisen välttämiseksi. Uunin luukun irrottaminen: 1. Avaa uunin luukku kokonaan auki (katso kuvaa 1).
1
2. Nosta ylös luukun kaksi kiinnikettä ja työnnä niitä eteenpäin kunnes ne pysähtyvät (katso kuvaa 2).
2
3. Sulje luukkua sen verran, että voit vetää sen ylös (katso kuvaa 3). Varo vahingoittamasta saranoita kun puhdistat uunia ja/tai irrotat luukun (kuva 4).
Luukun kiinnittäminen paikalleen: 1. Aseta saranat uriin ja laske luukku kokonaan alas. 2. Laske kiinnikkeet alas. 3. Sulje uunin luukku. Huomaa: näitä ohjeita on noudatettava sekä henkilövammojen että uunin luukun ja saranoiden vahingoittumisen välttämiseksi.
3
Uunin takalampun vaihtaminen:
1. Kytke uuni irti sähköverkosta. 2. Kun uuni on jäähtynyt, ruuvaa lampun suojus irti (katso kuvaa 5). 3. Vaihda lamppu (katso huomautusta). 4. Ruuvaa lampun suojus takaisin paikalleen. 5. Kytke laite sähköverkkoon. Huomautus: käytä vain lamppuja 25 W/230 V, tyyppi E-14, T300°C, joita on saatavissa Huoltopalvelusta. T�RKE��: �lä kytke uunia päälle ellei lampun suojus ole paikallaan.
4
5
72
|