|
|
|
Categories
|
|
Information
|
|
Featured Product
|
|
|
 |
|
|
There are currently no product reviews.
 ;
Nothing wrong with the manual or the delivery - came to me the same day I ordered it. But afterwards I realized that I ordered the wrong manual. Probably better with the Quick start - version. So maybe it would be better if we could see a list with inhold for each manual before ordering?
 ;
Bought T4850 High End Tuner a few years ago, but i didn't know where all the buttons were used for. So i purchased the owners manual. Perfect! Just what i needed.
;
Bought the used Philips car-radio. No manual! Found on this site a copy of the orginal English manual. I am very happy with it. Now I know how to setup and use my "new" car-radio.
Recommended site for everybody looking for a manual for (older) products!
;
Great deal, you are the only one on earth who could deliver this old manual. Thx so much and have nice chrismas
;
Everything is OK. Owner's Manual I downloaded ( I get link for it by email).
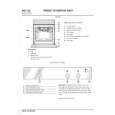
53872-gb.fm5 Page 10 Tuesday, February 27, 2001 3:35 PM
CLEANING THE OVEN AND ACCESSORIES
Removing the oven door (for cleaning) 1. Open the oven door. 2. Press hinge catches (A) forwards. 3. Lift the catches until they engage and then remove the door. 4. Warning: While you are cleaning the oven, ensure you do not disengage the hinge retainer catches. 5. Refit the oven door by following the above steps in reverse order. Dropping the grill element to clean the oven roof (depending on model) � Do not attempt to clean the oven until it is cool. 1. To clean the oven roof, pull out the grill element and lower it as far as it will go. 2. Clean the oven roof and then return the grill element to its original position. Changing the oven lamp 1. Disconnect the oven from electrical supply. 2. Unscrew the lamp cover. 3. Change the lamp (see N.B.). 4. Refit the lamp cover. 5. Reconnect the electrical supply. Changing the lateral lamp (depending on model) Disconnect the oven from electrical supply. Remove the left hand side grid. Use a screwdriver to prize off the lamp cover. Change the lamp (see N.B). Reposition the lamp cover and press it against the oven wall until it clicks into place. 6. Refit the side grid. 7. Reconnect the power supply. N.B: Use exclusively 25 W 230 V lamps, type E-14, T300° C, available from After-Sales Service. 1. 2. 3. 4. 5.
.
TROUBLESHOOTING GUIDE
Oven not working � Switch the oven off and then on again to see if the problem persists. � Check for the presence of mains electrical power. � Oven selector on position �0� ? � Check whether you have made the temperature setting and the function setting. � If the electronic programmer display (depending on model) presents the message �OFF�, press any key to reset the oven and then set the clock. Ensure that the mechanical programmer (depending on model) is set to .
�
10
|
|
|
> |
|