|
|
|
Categories
|
|
Information
|
|
Featured Product
|
|
|
 |
|
|
There are currently no product reviews.
 ;
High quality scan of the manual, very quick and easy download and very important, a truly honest price. thanks
 ;
Minden rendben, de két megjegyzés, az ábrák nehezen kivehetők és a fizetés után 24 órát kell várni a letöltésre.
;
Manual correct, and complete. Downloads cleanly. Format of manual was presumably difficult to PDF to A4, but works reasonably well.
;
This was a hard to find manual. When I did find it , some sites wanted way too much for the file.
Owner-manual .com had it for a really reasonable price. Not only that but it was sent very quickly and was a quality scanned document, unlike some others I purchased from a different site.
Good job guys!!
Larry
;
Fast and courteous service. Product delivered as described. Thank you.
53872-gb.fm5 Page 10 Tuesday, February 27, 2001 3:35 PM
CLEANING THE OVEN AND ACCESSORIES
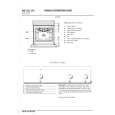
Removing the oven door (for cleaning) 1. Open the oven door. 2. Press hinge catches (A) forwards. 3. Lift the catches until they engage and then remove the door. 4. Warning: While you are cleaning the oven, ensure you do not disengage the hinge retainer catches. 5. Refit the oven door by following the above steps in reverse order. Dropping the grill element to clean the oven roof (depending on model) � Do not attempt to clean the oven until it is cool. 1. To clean the oven roof, pull out the grill element and lower it as far as it will go. 2. Clean the oven roof and then return the grill element to its original position. Changing the oven lamp 1. Disconnect the oven from electrical supply. 2. Unscrew the lamp cover. 3. Change the lamp (see N.B.). 4. Refit the lamp cover. 5. Reconnect the electrical supply. Changing the lateral lamp (depending on model) Disconnect the oven from electrical supply. Remove the left hand side grid. Use a screwdriver to prize off the lamp cover. Change the lamp (see N.B). Reposition the lamp cover and press it against the oven wall until it clicks into place. 6. Refit the side grid. 7. Reconnect the power supply. N.B: Use exclusively 25 W 230 V lamps, type E-14, T300° C, available from After-Sales Service. 1. 2. 3. 4. 5.
.
TROUBLESHOOTING GUIDE
Oven not working � Switch the oven off and then on again to see if the problem persists. � Check for the presence of mains electrical power. � Oven selector on position �0� ? � Check whether you have made the temperature setting and the function setting. � If the electronic programmer display (depending on model) presents the message �OFF�, press any key to reset the oven and then set the clock. Ensure that the mechanical programmer (depending on model) is set to .
�
10
|
|
|
> |
|