|
|
|
Categories
|
|
Information
|
|
Featured Product
|
|
|
 |
|
|
There are currently no product reviews.
 ;
Genuine Toshiba owner's manual. Couldn't really ask for more. And written in understandable English in contrast to a few recent experiences I have had with manuals for other equipment other than Toshiba but made in China and written in "Chinglish"!
;
I purchased a vintage Sony mixer off eBay and within the hour was able to locate and purchase the manual for it.I mean really,where else can you find a manual for a product made in 1983!? It was easy to find and purchase/download the manual I needed.I will use this site again for other equipment I have! Great site!
;
manual de usuario perfecto y completo de buena calidad de impresion y muy detallado ideal !
 ;
It`s full copy of a service manual from url http://www.philips.owner-manuals.com/PM3216-service-manual-PHILIPS.html
;
perfect! you just sent to me the copy in Italian witout even my specification!!!! so you are really smart cooperative and efficient. To my opinion the best place all over to get a manual of electronics!!!!
3gb54361.fm5 Page 19 Thursday, May 9, 2002 6:01 PM
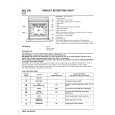
INSTALLATION
Cooktop
� The cooktop must be set into a worktop between 20 mm and 50 mm thick. There must be nothing between the cooktop and the oven (cross rails, brackets, etc.). � Cut an opening in the worktop of the dimensions shown in the product description sheet supplied separately. � If not already present, fit the supplied seal to the cooktop flange after cleaning the contact area as shown in the figure. � If the worktop is made of wood, fit the supplied spring clips. 1. Position the 4 spring clips (B) and fit them in their locations on the underside of the cooktop. 2. Fit the cooktop into the worktop. � If the worktop is made of marble, plastic, ceramics, natural stone, etc., the cooktop must be secured with brackets (C) to be requested from After Sales Service under part number 4819 310 18528. 1. Position the brackets over the holes and secure them with the supplied screws. 2. Fit the cooktop into the worktop.
Conventional electric cooktop
Glass-ceramic cooktop
N.B.: remove the protective film before installing the cooktop. � If the worktop is made of wood, fit the supplied spring clips. 1. Position the 4 spring clips (D) as shown and at the specified dimensions. 2. Secure the spring clips using screws (E). 3. Fit the cooktop into the worktop. � If the worktop is made of marble, plastic, ceramics, natural stone, etc., the cooktop must be secured with brackets (F) code 4819 404 78697 (to be requested from After Sales Service). 1. Fit the cooktop into the worktop. 2. Position the 4 brackets (F) as shown in the figure, in accordance with the thickness of the worktop. 3. Fix the 4 screws (G) in holes (H).
Top 30÷50 mm.
Top 30÷50 mm.
19
|
|
|
> |
|