|
|
|
Categories
|
|
Information
|
|
Featured Product
|
|
|
 |
|
|
There are currently no product reviews.
 ;
My first manual from Owner-Manuals.com but not the last! I am very satisfied with the easy ordering and promt delivery of a manual I did not find anywhere else.
 ;
This manual is very helpfull to use the Power Supply. All technical information has been available.
For service use the circuit diagrams are very good.
Thanks .
;
Very comprehensive document which is a must-have for any Satellit 2100 owner whose set up is somewhat intricate. Due to the bad quality of the pictures that are rather dark and a bit blurred I gave 4-star feedback.
;
The manual was missing 2 pages but when I presented the problem to the company they made every attempt to get the 2 pages to me, when they couldn't they refunded my money. A very pleasing and easy transaction. The manual they provided was the original, it was concise and to the point. I plan to do business with this company again when should the need arise.
;
The owners manual is very good. all my how to questions were answered in detail.
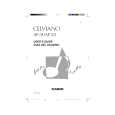
Montageanleitung
� Die Abbildungen in dieser Bedienungsanleitung zeigen das Modell AP-31.
1 Montage des Ständers
Die Abbildungen 3, 4 und 5 beachten, wenn der Ständer gemä� nachfolgender Vorgänge montiert wird.
Vorsicht
� Um Verletzungen zu vermeiden ist besondere Vorsicht geboten, wenn die Beine und Pedale eingebaut werden und wenn die Tastatur auf dem Ständer angebracht wird. � Bei der Montage ist darauf zu achten, dass der verschiebbare Tastaturdeckel des Pianogehäuses vollständig geschlossen ist. Falls der Deckel während der Montage geöffnet verbleibt, könnte sich dieser plötzlich schlie�en und Ihre Finger zwischen dem Pianogehäuse und dem Deckel einklemmen.
Abbildung 3
G A
F
I
E I C
L
I L
F
*
J E I*
D H B G 3
WICHTIG!
� Den Ständer unbedingt auf einer waagerechten Fläche montieren. � Dieser Ständer enthält nicht die Werkzeuge, die für die Montage erforderlich sind. Für die Montage wird ein gro�er Kreuzschlitz-Schraubendreher (+) benötigt.
Abbildung 1
A B C
x2 x2 x4 x1 x14 x2 x2 E F G H I J K L
Boden
Seitenteil
4
Querstück
5
D
x2
� Alle mit der Einheit mitgelieferten Teile überprüfen, um sicherzustellen, dass alle in Abbildung 1 gezeigten Teile (A bis L) vorhanden sind. Alle Schrauben befinden sich in einem Plastikbeutel, der an der Innenseite des Verpackungskartons festgeklebt ist.
Abbildung 2
1 2
1. Bringen Sie die Halterungen E unter Verwendung der Schrauben I an den Seitenteilen A und B an (Abbildung 3). � Wenn Sie die Halterung E an dem Seitenteil B anbringen, schieben Sie eine Klemme J in die Schraube I, bevor Sie die Schraube I an dem Punkt 3 in das Seitenteil schrauben. 2. Bringen Sie die Winkel F unter Verwendung der vier Schrauben I an den Seitenteilen A und B an (Abbildung 3). 3. Die Höheneinstellschraube H in die Bohrung 4 in der Mitte der Rückseite des Querstücks D einbauen (Abbildung 3). 4. Die Seitenteile A und B mit den vier Schrauben D an dem Querstück G anbringen (Abbildung 3). � Darauf achten, dass das Querstück D richtig positioniert ist, wie es durch 5 in dem Detail der Abbildung 3 dargestellt ist. Es sollte im rechten Winkel (90 Grad) zu den beiden Seitenteilen angeordnet sein. Auch darauf achten, dass die Seitenteile A und B parallel zueinander angeordnet sind. Falls die Teile nicht richtig positioniert sind, gelangen die in das Querstück D eingebauten Muttern nicht richtig in Eingriff mit den Schrauben G. Dies kann zu einem Ausbrechen der Gewinde und zu einem Durchdrehen der Muttern führen.
� Bevor Sie mit der eingentlichen Montage des Ständers beginnen, die Klemme an Position 1 (Abbildung 2), an der das Pedalkabel aus der Rückseite des Querstücks D austritt, lösen. Das aufgespulte Kabel herausnehmen und zwei Klemmen an den Punkten 1 und 2 befestigen, wie es in der Abbildung dargestellt ist.
427B-G-029A
G-27
AP31/33_G_26_30.p65
Page 27
03.10.23, 9:40 AM
Adobe PageMaker 6.5J/PPC
 $4.99 AP-31 CASIO
User Guide It's a complete guide ( also known as operating manual or owner's manual), and it's in PDF format. A…
|
|
|
> |
|