|
|
|
Categories
|
|
Information
|
|
Featured Product
|
|
|
 |
|
|
There are currently no product reviews.
 ;
Very good copy of Manual, clear and easy to print off, arrived very promptly and reasonably priced.
Thanks, I will use you again.
;
Zeer duidelijke afdrukken op A4-formaat , zeer uitgebreide handleiding . Pluspunt ,zeer snelle
respons van jullie , binnen de 24h . Top !!!
;
I AM HIGHLY IMPRESSED BY THE EASE OF USE OF THIS DOWNLOAD SERVICE. INSTRUCTIONS ARE CLEAR AND SIMPLE TO FOLLOW....EVEN BY TECHNOPHOBES SUCH AS MYSELF. THE EMAILS POINT YOU IN THE RIGHT DIRECTION...ITS SO EASY PEASY. THE DOWNLOAD CHOICE OF USER MANUALS IS EXTENSIVE AND I COULD NOT FIND A CHEAPER OR MORE EFFICIENT SERVICE ON THE INTERNET. I COULD NOT HAVE MADE A BETTER CHOICE OF INFORMATION PROVIDER. SHOULD I EVER NEED ANOTHER USER MANUAL, THEN THIS IS THE FIRST CHOICE SITE. COULD NOT BE BETTER PLEASED!!!!!!!...MANY THANXES FROM JIM BURNS
;
I was impressed with the quality of service (frequent e-mails to let you know the status of your order), and the speed at which the download became available. The manual was a life saver and was not easy to track down. Thank you for such an excellent service.
;
the manual was just what i wanted it had all the revelent information required to operate the hifi .Iwould use any manual i downloaded for any item which needs a manual
Performing
annual
maintenance
,
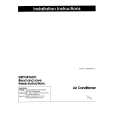
Your air conditioner needs annual maintenance to help ensure steady, top performance throughout the year. Call the service company recommended by your dealer to: l Inspect and clean the coils and condensate water passages. l Check fan. The compressor and fan motor are sealed and need no oiling. The expense of an annual inspection is the customer�s responsibility. OR If you are familiar with electrical appliances, you can do the cleaning and maintenance yourself. If you choose to do so, follow these steps: NOTE: Do not lift, push, or pull any white beaded foam (expanded polystyrene) parts. 1. Unplug the power cord. 2. Remove air conditioner from window. 3. Remove the front panel. (See �Cleaning the front panel and air filter� on page 7.)
Electrical Shock Hazard Unplug power cord from outlet before servicing. Be sure no liquid gets into the motor, electrical control box, or compressor terminals. Failure to follow these instructions can result in death, electrical shock, or serious injury.
Excessive Weight Hazard Use 2 or more people to move and install air conditioner. Failure to do so can result in back or other injury.
4. Remove the side curtains. Slide curtains out to their fullest width. From the back side, remove the Phillips-head screws which attach the curtains to the cabinet. (See A in illustration.) 5. Remove the slotted, hex-head screws holding the top channel. (See B in illustration.) 6. Remove slotted, hex-head screws on sides of cabinet. (See C in illustration.)
|
|
|
> |
|