|
|
|
Categories
|
|
Information
|
|
Featured Product
|
|
|
 |
|
|
There are currently no product reviews.
 ;
Thank you for providing this manual and at low cost.
The Philips scope is of excellent quality, longevity and build and had a couple of faults
when it was passed to me. Having the CCT diagrams is a blessing.
I have fixed the problems and also modded the scope to my requirements.
I have built a 24v Li-Ion pack for portable use from old but good laptop batts.
it is working beautifully and I am well pleased. Keep up the good work Guys.
 ;
manual was very helpful in learning how to propery use my washer. I could not find this manual anywhere else.
;
Awesome quality manual. You really saved my bacon with this one. Was looking for some specific information with regards to my "new" vintage VCR that didn't come with the owners manual. This site is truely a goldmine of available manuals. The quality of the scans are top notch.
Thank-you so much for this awesome manual. If you're looking for this Sony SL-HF400 owners manual, this is the one you NEED to buy. Definitely worth the money.
;
The manual was made available promptly. I is a clean scan of the original. I had no problem downloading it. The scan was well centered and cleanly formatted. It is as good a product as can be had without being the original document.
;
Received downlink in less then 8 hours, Item was in good copy condition, and told me how to program the clock timer. The price was very resonable, and the process was very automated and was GREAT to work with.
Performing
annual
maintenance
,
Your air conditioner needs annual maintenance to help ensure steady, top performance throughout the year. Call the service company recommended by your dealer to: l Inspect and clean the coils and condensate water passages. l Check fan. The compressor and fan motor are sealed and need no oiling. The expense of an annual inspection is the customer�s responsibility. OR If you are familiar with electrical appliances, you can do the cleaning and maintenance yourself. If you choose to do so, follow these steps: NOTE: Do not lift, push, or pull any white beaded foam (expanded polystyrene) parts. 1. Unplug the power cord. 2. Remove air conditioner from window. 3. Remove the front panel. (See �Cleaning the front panel and air filter� on page 7.)
Electrical Shock Hazard Unplug power cord from outlet before servicing. Be sure no liquid gets into the motor, electrical control box, or compressor terminals. Failure to follow these instructions can result in death, electrical shock, or serious injury.
Excessive Weight Hazard Use 2 or more people to move and install air conditioner. Failure to do so can result in back or other injury.
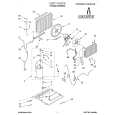
4. Remove the side curtains. Slide curtains out to their fullest width. From the back side, remove the Phillips-head screws which attach the curtains to the cabinet. (See A in illustration.) 5. Remove the slotted, hex-head screws holding the top channel. (See B in illustration.) 6. Remove slotted, hex-head screws on sides of cabinet. (See C in illustration.)
|
|
|
> |
|