|
|
|
Categories
|
|
Information
|
|
Featured Product
|
|
|
 |
|
|
There are currently no product reviews.
 ;
Last week I bought a second hand BAUKNECHT TRK4850 DRYER. It is a professional machine with many programs and switch options. I feared it would be a huge quest to find a manual. I was delighted when I found owner-manuals.com. After payment I received the file to download the next day already. The quality is great. I am very happy. Thanks!
but kindly the distributions of the operating programs not find in the owners manual,can you help me to understand the operating programs instructions thank you
;
Very good copy, very readable and easy transaction as always.
;
It is perfect, exactly what we needed. It's like the paper version but less clutter.
 ;
Received my manual within 24 hours. Very clear scan of the manual I needed. Thanks!
;
Very clear scan, I recommend it. Definitely a must have for any 3362 owner.
Alpine could have written a slightly more complete manual, though. It's already pretty huge, but the unit has so many functions, I feel some more explanation would have been better.
Yamaha's manual of their comparable YDSP-1 is a little better in my opinion.
Performing
annual
maintenance
,
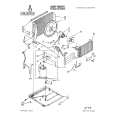
Your air conditioner needs annual maintenance to help ensure steady, top performance throughout the year. Call the service company recommended by your dealer to: l Inspect and clean the coils and condensate water passages. l Check fan. The compressor and fan motor are sealed and need no oiling. The expense of an annual inspection is the customer�s responsibility. OR If you are familiar with electrical appliances, you can do the cleaning and maintenance yourself. If you choose to do so, follow these steps: NOTE: Do not lift, push, or pull any white beaded foam (expanded polystyrene) parts. 1. Unplug the power cord. 2. Remove air conditioner from window. 3. Remove the front panel. (See �Cleaning the front panel and air filter� on page 7.)
Electrical Shock Hazard Unplug power cord from outlet before servicing. Be sure no liquid gets into the motor, electrical control box, or compressor terminals. Failure to follow these instructions can result in death, electrical shock, or serious injury.
Excessive Weight Hazard Use 2 or more people to move and install air conditioner. Failure to do so can result in back or other injury.
4. Remove the side curtains. Slide curtains out to their fullest width. From the back side, remove the Phillips-head screws which attach the curtains to the cabinet. (See A in illustration.) 5. Remove the slotted, hex-head screws holding the top channel. (See B in illustration.) 6. Remove slotted, hex-head screws on sides of cabinet. (See C in illustration.)
|
|
|
> |
|