|
|
|
Categories
|
|
Information
|
|
Featured Product
|
|
|
 |
|
|
There are currently no product reviews.
 ;
This is a very good quality print (scan) of the original SONY service manual. The original from Sony is on very thin paper. Nevertheless it is very clear and sharp and excellent readable. I'm very satisfied to have now this rare document. I've looking for it many years (infrequent). It contains very detailed circuit diagrams, exploded views, part lists, PCB view with good readable connection lines. Very recommended.
;
A complete manual with all the needed details of calibrations and service instructions about the radio receiver.
A big deal.
Many thanks !
;
Fast delivery and good quality copy. To be recommended
;
Excellent product, very clear print. Detailed circuit and assembly diagrams - this enabled me to repair my CD player with confidence. I highly recommend this site.
;
Fast access, 100% correct and complete service manual
2. Copier adjustment
A. Process section
(1) Developing doctor gap adjustment
1) Remove the screw and the connector which connect the toner hopper and the developing unit, and separate them. 2) Loosen the DV doctor fixing screw A. 3) Insert a 0.53mm (0.6mm for AR-280/285/335) thickness gauge into the clearance of 40mm ~ 70mm from the DV doctor edge.
40mm 30mm
17.0mm
A
30mm 40mm
P
2~3mm
2~3mm
4) Press the DV doctor in the arrow direction and tighten the DV doctor fixing screw. (Perform the same procedure for the front and the rear frame.) 5) Check that the clearance (2 positions) at 40mm ~ 70mm from the both ends is 0.53 ± 0.03mm (0.6 ± 0.03mm for AR-280/285/335). * When inserting a thickness gauge, be careful not to scratch the DV doctor and the MG roller.
17.0mm
(3) Developing bias voltage adjustment
1) Set the digital multi-meter range to the DCV range. 2) Put the test probes between the DV bias output check pin (CN2-1 pin) of the high voltage unit and the chassis (GND).
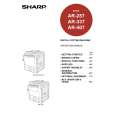
(2) MG roller main pole position adjustment
1) Remove the screw and the connector which connect the toner hopper and the developing unit, and separate them. Put the developing unit on a flat floor. 2) Tie a needle or pin on a string. 3) Hold the string and put the needle horizontally and move it toward the MG roller. (Do not use a clip which is too big to have a correct position since the MG roller diameter is small.) 4) With the needle tip at 2 ~ 3 mm apart from the MG roller surface, mark the point on the surface which is on the extended line of the needle tip. 5) Measure the distance between the marking position and surface P of the developing unit and check that it is 17mm. If the distance is not as specified above, loosen the fixing screw of the main pole adjustment plate, and move the adjustment plate to adjust.
7/13/2000
6�2
 $4.99 AR407 SHARP
Owner's Manual Complete owner's manual in digital format. The manual will be available for download as PDF file aft…  $4.99 AR-407 SHARP
Parts Catalog Parts Catalog only. It's available in PDF format. Useful, if Your equipment is broken and You need t…
|
|
|
> |
|