|
|
|
Categories
|
|
Information
|
|
Featured Product
|
|
|
 |
|
|
There are currently no product reviews.
 ;
Yes thank you i got the file i was after. There was a slight problem in my communication but it all worked out well.
A job well done.
 ;
Great manual...really saved me. The only problem is that I thought I would be able to download it directly when I paid for it but never received the download instructions until the next morning. The board trace pages were somewhat light also: really need to turn up the contrast on the printer before printing them. The schematic page was great; very clear! Well worth the money.
;
I've been in the electronic business for a long time. I used to buy Sam's Photofact for my needs which intailed having to go to the store and paying about $20 for a package of 3 different units so I was forced to buy more than I needed just to get one.
Owner manual is just at your keyboard and the information is almost instantansouly and the cost is very reasonable. Easy to print out if needed or simply read off of the screen. The larger the screen the better for obvious reasons.
;
Very good manual, at a very good price. Received in a timely manner
;
Only thу cover has poor quality, internal material has excellent quality - exactly what I needed
Thanks!
(1) Lead edge adjustment
1) Set a scale to the center of the paper lead edge guide as shown below, and cover it with B4 or 8 1/2" x 14" paper.
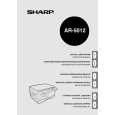
(2) Image rear edge void amount adjustment
1) Set a scale to the rear edge section of A4 or 11" x 8 1/2" paper size as shown in the figure below, and cover it with B4 or 8 1/2" x 14" paper.
B4 or 8 1/2� � 14� paper
A4 size rear edge
2) Execute SIM 50 - 01 to select the image rear edge void amount adjustment mode. The set adjustment value is displayed on the copy quantity display. 3) Make a copy and measure the void amount of image rear edge. 2) Execute SIM 50 - 01 3) Set the print start position (AE lamp ON) (A), the lead edge void amount (TEXT lamp ON) (B), and the scan start position (PHOTO lamp ON) (C) to 0, and make a copy of a scale at 100%. 4) Measure the image loss amount (R mm) of the scale image. Set C = 10 X R (mm). (Example: Set the value of C to 30.) When the value of C is increased by 10, the image loss is decreased by 1mm. (Default: 50) 5) Measure the distance (H mm) between the paper lead edge and the image print start position. Set A = 10 X H (mm). (Example: Set the value of A to 50.) When the value of A is increased by 10, the image lead edge is shifted to the paper lead edge by 1mm. (Default: 50) 6) Set the lead edge void amount to B = 50 (2.5mm). When the value of B is increased by 10, the void amount is increased by about 1mm. For 25 or less, however, the void amount becomes zero. (Default: 50) 4) If the measurement value is out of the specified range, change the set value and repeat the adjustment procedure. The default value is 50. Note: The rear edge void cannot be checked with the first sheet after entering the simulation mode, the first sheet after turning off/on the power, or the first sheet after inserting the cassette. Use the second or later sheet to check the rear edge void.
Void amount (Standard value: 2 3mm)
Scale image Paper rear edge
(Example) Distance between paper lead edge and image: H = 5mm Image loss: R = 3mm
(3) Center offset adjustment
1) Set the self-made test chart for the center position adjustment so that its center line is aligned with the center mark of the document guide. � Test chart for the center position adjustment. Draw a line at the center of A4 or 8 1/2" x 11" paper in the paper transport direction.
Document guide
5mm
10mm
Center Copy paper (A4 or 8 1/2� � 11�)
2) Execute SIM 50 - 10 to select the print center offset (cassette paper feed) adjustment mode. The set adjustment value is displayed on the copy quantity display.
AR-5012 ADJUSTMENTS 9 - 3
 $4.99 AR5012 SHARP
Owner's Manual Complete owner's manual in digital format. The manual will be available for download as PDF file aft…
|
|
|
> |
|