|
There are currently no product reviews.
 ;
Having bought a pre-owned Sony FM stereo tuner through eBay, it came without any manuals. It soon became clear that to get the best from this excellent tuner I needed a decent manual because much of the operation was not intuitive to a newboy to hi fi like me. I managed to download the official Sony multi-lingual manual from Owner-Manuals.com with no problem at all - a really quick and easy service. I'm very glad I did because I found out all the operations of the tuner and was then able to not only set it up quickly but also to get much more from it that poke-and-hope trialling would ever achieve. In my book $4.99 very well spent.
;
This manual is immaculate in it's accuracy. Everything is written very clearly and easy to understand. Written by a professional who wants to convey a clear and easy to understand message!!
;
This Manual (as downloaded) is both informative and comprehensive and has proved to be extremely useful. thoroughly recommended.
;
everything is ok, thank you very much! Product is good, no problems with download!
;
Great site, I always find all the manuals I need and i can't find anywhere else. PDF for the Sony PCM 3348 is complete and scan is good quality. Thank you!
3de33020.fm5 Page 7 Tuesday, April 9, 2002 2:57 PM
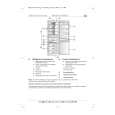
Aufbewahrung von Lebensmitteln im Kühlraum Die Lebensmittel wie auf der Abbildung gezeigt einlagern. A. Gekochte Speisen B. Fisch, Fleisch C. Obst und Gemüse D. Flaschen E. Butter F. Milchprodukte, Käse Zur optimalen Erhaltung des Vitamin-, Aroma- und Frischegehalts der Lebensmittel wird empfohlen, diese in Alu- oder Klarsichtfolie einzuschlagen oder zur Aufbewahrung entsprechende Behälter zu verwenden. Auf diese Weise wird eine Vermischung von Gerüchen vermieden. Bitte beachten Sie Da die Temperatur dank dem neuen Ventilationsumluftsystem (MULTI-FLOW Abb. 1)nahezu konstant bleibt, können die Lebensmittel beliebig im Innenraum verteilt werden; es wird jedoch empfohlen, die Lebensmittel wie in Abb. 2 gezeigt zu positionieren, wobei darauf zu achten ist, die Luftdüsen (5) Abb. 1 nicht zuzustellen, damit die Luft frei zirkulieren kann. Lagern Sie keine warmen Speisen ein.
Abb. 2
BENUTZUNG DES �FRISCH�-FACHS (MODELLABH�NGIG)
Das Gerät verfügt über ein spezielles �FRISCH�-Fach. Die Temperatur wird über den Luftregler (4) eingestellt � In Richtung (+) drehen, um eine tiefere Temperatur einzustellen. � In Richtung (-) drehen, um eine höhere Temperatur einzustellen. Herausnehmen des �FRISCH�-Fachs Gehen Sie folgenderma�en vor, um die einzelnen Elemente des Abteils für längere Zeit (ausgenommen für die übliche Reinigung) zu entfernen � Nehmen Sie die obere Isoliertrennwand und das Schubfach heraus (siehe Abbildung). Jetzt wird die Temperatur des freigewordenen Raums automatisch auf die für den Kühlteil eingestellte Temperatur geregelt.
7
|