|
|
|
Categories
|
|
Information
|
|
Featured Product
|
|
|
 |
|
|
There are currently no product reviews.
 ;
perfecto manual ,completo y detallado de muy buena calidad de impresion, ideal en una palabra.
;
un manual completo con una calidad de imagen buena con explicaciones en varios idiomas de los ajustes y detalles en conjunto un OK.
;
Good copy, clear and has all necessary information. Very happy with the purchase
 ;
buen manual con sus formas de onda y esquemas , completo y de buena calidad de imagen, es correcto.
;
This is exactly what I needed This was a hard one to find and I had already downloaded several for other Panasonic radios but none matched my radio.
Although my radio is the LBE model the LBS is the same.
A very good quality manual with every thing you should get in it
�
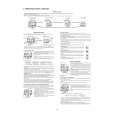
If the clearance is narrow at the upper part: Turn knob A and knob B clockwise so that the clearances at the upper part and lower part are uniform.
7. Attach the exit tray and tray 3.
Insert the three pawls at the rear side of tray 3 into the holes of the tray mounting platform and secure the tray using two screws. Attach the two exit trays to the finisher from the boss at <1>.
(2) (1) Exit trays Screws D
�
If the clearance is wide at the upper part: Turn knob A and knob B counterclockwise so that the clearances at the upper part and lower part are uniform.
Knob A
Knob B
Pawl Pawl Tray 3 Pawl
Clearance
8. Attach the paper holder plates. � Attach the 2 paper holder plates to the attaching
finisher by fitting them as shown in the illustration.
portion in the
Clearance
<2> If the guide pin of the lock plate does not match the connecting hole of the finisher: Turn the knobs at the lower part of the finisher to adjust the height.
Paper holder plates
�
If the connecting hole is displaced toward the rear side: Turn knob B counterclockwise so that the connecting hole matches the guide pin. Then, push the finisher into the copier. If the clearance between the finisher and copier is not proper, adjust the clearances at the upper part and lower part using procedure <1>.
(Top view)
Guide pin
9. Attach the staple cartridge to the staple unit.
1 Turn the staple unit to face the front.
1
Knob A Knob B
�
If the connecting hole is displaced toward the front side: Turn knob A counterclockwise so that the connecting hole matches the guide pin. Then, push the finisher into the copier. If the clearance between the finisher and copier is not proper, adjust the clearances at the upper part and lower part using procedure <1>.
(Top view)
Guide pin
2
Insert the staple cartridge into the staple unit until it clicks in place.
2
Knob A
Knob B
2�3
|
|
|
> |
|