|
|
|
Categories
|
|
Information
|
|
Featured Product
|
|
|
 |
|
|
There are currently no product reviews.
 ;
We received the manual in a timely manner and it was exactly what we were expecting. Excellent replacement for original Service Manual.
All schematics are very legible. We are really satisfied.
;
We received the manual in a timely manner and it was exactly what we were expecting. Excellent replacement for original Service Manual.
All schematics are very legible. We are really satisfied.
;
We received the manual in a timely manner and it was exactly what we were expecting. Excellent replacement for original Service Manual.
All schematics are very legible. We are really satisfied.
;
We received the manual in a timely manner and it was exactly what we were expecting. Excellent replacement for original Service Manual.
All schematics are very legible. We are really satisfied.
;
We received the manual in a timely manner and it was exactly what we were expecting. Excellent replacement for original Service Manual.
All schematics are very legible. We are really satisfied.
5) Connect the power supply unit harness to the PCU PWB of the main unit of the printer. <1>Remove the screw that fixes the harness cover of the main unit of the printer and slide the harness cover up to remove it. Process the harness cover as shown in the illustration.
Screw
7) Attach the rear cabinet of the stand/paper drawer. <1>Pass the cord of the power supply unit through the hole of the rear cabinet and attach the rear cabinet to the stand/paper drawer.
Cut out.
Rear cabinet
Harness cover
<2>Connect the optional power supply harness connector to CN11 (red connector) of the PCU PWB of the main unit of the printer.
<2>Attach the AC inlet cover to the rear cabinet of the stand/paper drawer and fix it with the removed screw.
Connector
CN11
AC inlet cover
<3>Reattach the harness cover to its original position and fix it with the removed screw. At this time, ensure that the optional power supply unit harness is arranged as shown in the illustration. �Fix the harness securely to the wire saddle.
Screw
8) Connect the AC cord of the power supply unit to the main unit of the printer. Connect the AC cord of the power supply unit to the outlet connector of the main unit of the printer at the location shown in the illustration.
Screw Optional power supply harness
Harness cover Wire saddle Wire saddle
AC cord
6) Connect the relay harness of the stand/paper drawer to the power supply unit. Connect the relay harness of the stand/paper drawer to the connector of the power supply unit.
Connector of the power supply connector
Relay harness of the stand/paper drawer
AR-M350 UNPACKING AND INSTALLATION 6-4
 $4.99 ARM450 SHARP
Owner's Manual Complete owner's manual in digital format. The manual will be available for download as PDF file aft… 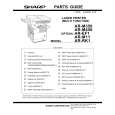 $4.99 AR-M450 SHARP
Parts Catalog Parts Catalog only. It's available in PDF format. Useful, if Your equipment is broken and You need t…
|
|
|
> |
|