|
There are currently no product reviews.
 ;
Good quality, clear diagrams. Exactly what I needed.
 ;
Good product. All the information is invcluded, but due to the complexity of the amplifier, it still is difficult to get it to operation again.
;
Very professional seller; very fast, accurate and rielable service.
;
great works fine, got the manual on mail within a day
;
First class Service,
best quality, come again
Thank You.
vac
(5)
1) 2) 3) 4)
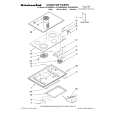
Processing Tray Upper Cover
Remove the front cover. (See (2).) Remove the rear cover. (See (3).) Remove the upper cover. (See (4).) Disconnect the connector [1] and remove the screw [2].
(7)
1) 2) 3) 4) 5)
Removing the Saddle Guide
Remove the delivery tray. (See (1).) Remove the front cover. (See (2).) Remove the rear cover. (See (3).) Free the delivery tray support plate (front) [1] and the delivery tray support plate (rear) [2] to the outside from the rail grooves. Remove the four screws [3].
[3] [2]
[3]
[1]
[3]
[3]
[2]
6) Shift the side guide [4] lightly to the front, and free the engagement of the paper surface detecting lever (rear) [5]; then, detach the side guide [4].
[1]
5) While lifting the processing tray cover [3], disconnect the connector [4], then remove the processing tray upper cover [3].
[5]
[3]
[4]
NOTE: Be sure to mount the side guide after securely fitting the paper surface detecting lever (rear) [5] in the groove of the paper surface detecting lever (middle) [6]. After completion of mounting, push the paper surface detecting lever several times to make sure that side guide is mounted securely.
[4]
(6)
1) 2) 3)
Upper Right Cover, Middle Right Cover
Remove the front cover. (See (2).) Remove the rear cover. (See (3).) Open the upper cover, then remove the upper right cover and the middle right cover.
[5]
1
[6]
[5]
[6]
2
MX-FNX2/AR-PN1/MX-RBX1 DISASSEMBLY AND ASSEMBLY 6 � 2
 $4.99 AR-PN1D SHARP
Parts Catalog Parts Catalog only. It's available in PDF format. Useful, if Your equipment is broken and You need t…
|