|
|
|
Categories
|
|
Information
|
|
Featured Product
|
|
|
 |
|
|
There are currently no product reviews.
 ;
This is one of four manuals I have downloaded recently.
Purchase was very straight forward and the authorising email arrived in about 4 hours.
The quality of the scan is good. Print is clear and square to the page edges.
;
Exactly as advertized. High quality digital copy of the Nak 610 user manual. Easy download and access. Highly recommended.
;
The manual was exactly what I wanted and I found it nowhere else. Thanks!
;
Having purchased a 1994 Kenwood music system from a Charity shop in 2013 (it was a high end product in its day), I found myself not quite knowing where to plug in what, and how to do this, that and the next thing. I needed a Manual, and after failure with another online 'Manual provider' I found Owner Manuals dot com. Well, I wasn't sure, but it was only $5, and if things didn't work out, I wouldn't have lost much...
But things DID work out. After paying my childrens inheritance money, $4.99, I was sent a Manual for my Kenwood System very quickly. Alas, it was in German, and being Scottish, I could not read it or get my system in order from it...a rapid email to them brought the English Manual in short order, and my retro-system was and IS up and running in it's regulation settings.
I am very grateful to http://www.owner-manuals.com for their quick service and for even having such an obsolete Manual in the first place! If you need a Manual for ANYTHING, try here first. I wouldn't be surprised if I bought a 1928 Marconi radio, and got the user Manual for THAT here too!
Top marks.
John Copeland
Glasgow
Scotland
;
I was so happy that the owner's manual was available. It is well written and helped me to use the radio/CD player/recorder without problems. Thanks for making it available.
Irene Lambert
33046d.fm5 Page 10 Monday, June 12, 2000 11:46 AM
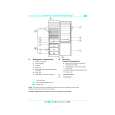
INSTALLATION
� � � Das Gerät nicht neben einer Wärmequelle aufstellen. Das Gerät an einem trockenen und gut belüfteten Ort aufstellen. Das Gerät mu� vollständig eben aufgestellt werden. Bei Bedarf mit den Vorderfü�en regulieren. �ber dem Gerät einen Freiraum von mindestens 5 cm lassen. Einige Modelle verfügen über hervorstehende Seitenwände; die eine Aufstellung mit direktem Kontakt zur dahinter liegenden Wand ermöglichen. Ansonsten die Distanzstücke (falls mitgeliefert) im oberen Teil des Verflüssigers auf der Geräterückseite einsetzen. Bei den Modellen ohne Seitenwände beträgt der Abstand zwischen Gerät und Wand mindestens 4,5 cm. Das Geräteinnere reinigen (siehe Kapitel "Reinigung und Pflege"). Das mitgelieferte Zubehör einsetzen.
� �
� �
Elektrischer Anschlu�
� Die elektrischen Anschlüsse müssen den örtlichen Vorschriften entsprechend ausgeführt werden. Prüfen, ob der auf dem Typenschild angegebene Spannungswert mit der in der Wohnung verfügbaren Spannung übereinstimmt. Die Erdung des Gerätes ist gesetzlich vorgeschrieben. Der Hersteller haftet nicht für eventuelle Schäden an Personen, Haustieren oder Sachen, die infolge Nichtbeachtung der obengenannten Vorschriften entstehen. Falls Stecker und Steckdose nicht desselben Typs sind, die Steckdose von einer Fachkraft auswechseln lassen. Keine Verlängerungskabel, Vielfachsteckdosen oder Adapter verwenden.
�
�
�
�
10
|
|
|
> |
|