|
|
|
Categories
|
|
Information
|
|
Featured Product
|
|
|
 |
|
|
There are currently no product reviews.
 ;
High quality scan of the manual, very quick and easy download and very important, a truly honest price. thanks
 ;
Minden rendben, de két megjegyzés, az ábrák nehezen kivehetők és a fizetés után 24 órát kell várni a letöltésre.
;
Manual correct, and complete. Downloads cleanly. Format of manual was presumably difficult to PDF to A4, but works reasonably well.
;
This was a hard to find manual. When I did find it , some sites wanted way too much for the file.
Owner-manual .com had it for a really reasonable price. Not only that but it was sent very quickly and was a quality scanned document, unlike some others I purchased from a different site.
Good job guys!!
Larry
;
Fast and courteous service. Product delivered as described. Thank you.
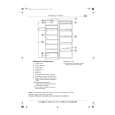
Converting 3 Wire to 4 Wire Power Cord
1. Remove rear wire cover. 2. Remove bottom strain relief screw and retain for further use. 3. Remove screw/hex nuts from terminal block and retain for further use. 4. Remove all 3-wire or cable leads from the terminal block and proceed to remove the power cord from the unit by pulling in a downward motion so that cord is removed from strain relief. 5. Remove the grounding strap attached to the center terminal on the terminal block. � Grounding strap is not needed for this installation. � Remove green ground screw and retain for future use. 6. To install the 4-wire cord, please follow step 4 through step 9 of Installing 4 Wire Cord. 7. Reinstall rear cover and secure it with screw removed earlier.
Anti-tip Bracket Installation
To reduce risk of range tipping, secure range with a properly installed anti-tip bracket. 1. Remove storage drawer from range. � See �Removing Storage Drawer� section. 2. Unscrew leveling legs so when range is moved into position range top clears counter top. � Left or right rear leveling leg must extend at least ¼ inch to engage bracket. � Anti-tip bracket can be installed on either right or left rear leveling leg.
or
3. Move range to where it will be installed. 4. Position anti-tip bracket. � With range in position, reach through storage drawer opening and slide anti-tip bracket on either left or right rear leveling leg. Slide leg into V-shaped notch in bracket. 5. Mark location of side and front of anti-tip bracket on floor. 6. Remove anti-tip bracket and range from opening. 7. Position anti-tip bracket according to lines marked on floor. 8. Mark 2 hole locations in anti-tip bracket. 9. Drill 2 holes. � If drilling into wood, use a 3/32 inch drill bit. � If drilling into concrete, use a 3/16 inch masonry drill bit and insert plastic anchors. 10. Secure bracket to floor using screws supplied. 11. Slide range into position. � See �Level Range� section of manual. 12. Confirm anti-tip bracket is engaged with range leveling leg and replace storage drawer.
10
|
|
|
> |
|