|
There are currently no product reviews.
 ;
I was very satisfied with the service manual I ordered and downloaded. I will definitely buy again from this seller.
;
Great product. Recieved it fast...exactly as advertised.
;
Manuals were delivered promptly and were correct as advertised. No issues with the download link which was provided promptly after everything was processed. Very pleasant experience
;
Paid for service manual & got the download fast - worth a visit if you need a service manual
;
It's the manual, I am searching for. Now I am able to repair my Braun A501.
AV-20FD24
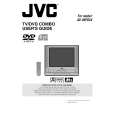
1-5: DVD PCB/DVD DECK (Refer to Fig. 1-5) 1. Make the short circuit on the position as shown Fig. 1-5 using a soldering. If you remove the DVD Deck with no soldering, the Laser may be damaged. 2. Unlock the 2 supports 1. 3. Remove the Front Tray Plate in the direction of arrow (A). 4. Disconnect the following connectors: (CP2001, CP2301 and CP2302). 5. Remove the 4 screws 2. 6. Remove the DVD Deck in the direction of arrow (B). 7. Remove the 4 screws 3. 8. Remove the DVD PCB in the direction of arrow (C).
1 1
(A)
Front Tray Plate
Pick Up PCB
2 2
2
Deck CD
2 3
(B) Make the sort circuit using a soldering.
3 3
DVD PCB CP2301 (C)
3
CP2001 CP2302
Deck Angle
Fig. 1-5 NOTE When the installation of the DVD Deck, remove all the soldering on the short circuit position after the connection of Pick Up PCB and DVD PCB connector.
8
No. 52133
|