|
|
|
Categories
|
|
Information
|
|
Featured Product
|
|
|
 |
|
|
There are currently no product reviews.
 ;
This is the original manufacturers service manual, with detailed info on the circit boards, explosion drawings of all parts in assembly order, and tuning instructions. The only thing missing is the information on the dimensions of the various drive belts. mail me if you need them. gcrossman_at_aol.com
;
Ordered service manuel for a hard to find plasma tv - your company made it easy to find and purchase - I will use you again
Thanks for your help
 ;
This is a high quality manual with clear schematic and components layout diagrams ; with service procedure included.
;
This service manual for the Kenwood KT-990D was reproduced really well ,is very legible and manual is complete.Combined with the low price paid,in the future,I will be checking Owner-Manuals.com any time I need a manual.
;
When I purchased this manual I had my doubts regarding the quality as the price was so reasonable as compared to other outlets.
The manual itself is of high standard the print is very clear as are the diagrams. Obviously with the diagrams one has to zoom in otherwise it is to small to be able to read.
Overall I am very pleased with the company who delivered as they said and with the manual they supplied.
I occasionally require a manual and now having registered with this company I shall order from them in the future.
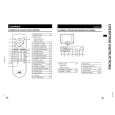
AV-21F8
PURITY, CONVERGENCE ADJUSTMENT
PURITY ADJUSTMENT
1. Demagnetize CRT with the demagnetizer.
WEDGE DEFLECTION YOKE
2. Loosen the retainer screw of the deflection yoke.
P
3. Remove the wedges. (Fig. 1.)
CRT
46
4. Input a green raster signal from the signal generator, and turn the screen to green raster.
P/C MAGNETS � P/C MAGNETS P : PURITY MAGNET 4 : 4 POLES (convergence magnets) 6 : 6 POLES (convergence magnets)
5. Move the deflection yoke backward.
6. Bring the long lug of the purity magnets on the short lug and position them horizontally. (Fig. 2)
Fig. 1 7. Adjust the gap between two lugs so that the green raster will come into the center of the screen. (Fig. 3)
8. Move the deflection yoke forward, and fix the position of the deflection yoke so that the whole screen will become green.
Long lug
PURITY MAGNETS
9. Insert the wedge to the top side of the deflection yoke so that it will not move.
10. Input a cross-hatch signal.
Short lug Bring the long lug over the short lug and position them horizontally.
11. Verify that the screen is horizontal.
Fig. 2 12. Input red and blue raster signals, and make sure that purity is properly adjusted.
(FRONT VIEW) GREEN RASTER
CENTER
Fig. 3
24
No. 56035
|
|
|
> |
|