|
|
|
Categories
|
|
Information
|
|
Featured Product
|
|
|
 |
|
|
There are currently no product reviews.
 ;
This Service manual is very well scanned and its clean to read, no any anti-theft words that un-english could understand. I got my CCD600 working with this manual and it´s clear shematics :)
;
I was very pleased with the service provided and was surprised at how good the quality was of the manual. I thought it may be a third generation copy or so, but it is as good as the websites that charge 3 times this much. I repair some electronics for family and friends without charge, so this is perfect for me. Thank you very much.
;
The service was great and the document was also great. Highly recommend!!!!
If anyone has a users manual... Please email me. need one. $ [email protected]
;
I needed a service manual as the display on my oscilloscope was very dim. I thought I'd give owner-manuals.com a try, as they advertised a huge number of manuals. Sure enough they had one listed. I bought it hoping it would be useful... actually, I bought it hoping it would be readable! I've had manuals from online sources in the past, and been very disappointed. Not this time! An excellent manual, complete, and very readable. Using it I fixed my 'scope, and as such the manual was an investment that paid off manyfold. Do I have any complaints? One very minor one - The circuit diagrams could have been scanned at a higher resolution, as some of the details were a little difficult to make out - not impossible, just not as easy as my old eyes would like! Overall, I'm very satisfied with my manual, and I will certainly be using this company again. Well done.
 ;
I Have looked for this manual for quiet a while now, I have finally found it here. I believe this is the only place they have them in a very nice scan, pages are very clear to read, some of the pages are a bit tilted but overall it is great to have this manual available for purchase. Thanks
AV-21W33 AV-21W33B
REMOVING THE CRT
* Replacement of the CRT should be performed by 2 or more persons.
CRT CHANGE TABLE
� After removing the rear cover, chassis etc.,
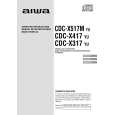
1. Putting the CRT change table on soft cloth, the CRT change table should also be covered with such soft cloth (shown in Fig. 2). 2. While keeping the surface of CRT down, mount the TV set on the CRT change table balanced will as shown in Fig. 3. 3. Remove 4 screws marked by arrows with a box type screwdriver as shown in Fig. 3. Since the cabinet will drop when screws have been removed, be sure to support the cabinet with hands. 4. After 4 screws have been removed, put the cabinet slowly on cloth (At this time, be carefully so as not to damage the front surface of the cabinet) shown in Fig. 4. The CRT should be assembled according to the opposite sequence of its dismounting steps.
APPROX. 35cm CLOTH
�
Fig. 2
�
CRT
* The CRT change table should preferably be smaller that the CRT surface, and its height be about 35cm.
CRT CHANGE TABLE BOX TYPE SCREW DRIVER
Fig. 3
CRT
COATING OF SILICON GREASE FOR ELECTRICAL INSULATION ON THE CRT ANODE CAP SECTION.
� Subsequent to replacement of the CRT and HV transformer or repair
of the anode cap, etc. by dismounting them, be sure to coat silicon grease for electrical insulation as shown in Fig. 5. 1. Wipe around the anode button with clean and dry cloth. (Fig. 5) 2. Coat silicon grease on the section around the anode button. At this time, take care so that any silicon greases does not sticks to the anode button. (Fig. 6) Silicon grease product No. KS - 650N Approx. 20mm (Do not coat grease on this section Silicon grease should be coated by 5mm or more from the outside diameter of anode cap.
CABINET CRT CHANGE TABLE
Fig. 4
CRT
Anode button
Silicon grease coating
Anode button (No sticking of silicon grease)
Coating position of silicon grease Anode cap
Fig. 5
Fig. 6
8
No. 52075
|
|
|
> |
|