|
There are currently no product reviews.
 ;
Good product. All the information is invcluded, but due to the complexity of the amplifier, it still is difficult to get it to operation again.
 ;
Very professional seller; very fast, accurate and rielable service.
;
great works fine, got the manual on mail within a day
;
First class Service,
best quality, come again
Thank You.
vac
;
I didn't realise a manual for an early plasma TV such as the one we were gifted could be so easily obtained. No manual was supplied with it, and as senior citizens we were a little puzzled over some aspects of its use. I do not want a listing for your store credit as we are not fairly big computer users. The manual was well organised, as it should be, with its backing of the Pioneer name. The download was prompt and everything worked quite smoothly. Thank you. Gordon.
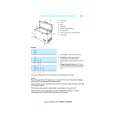
4.7.8 PURITY AND CONVERGENCE PURITY ADJUSTMENT (1) Demagnetize CRT with the demagnetizer. (2) Loosen the retainer screw of the deflection yoke. (3) Remove the wedges. (4) Input a green raster signal from the signal generator, and turn the screen to green raster. (5) Move the deflection yoke backward. (6) Bring the long lug of the purity magnets on the short lug and position them horizontally. (Fig.2) (7) Adjust the gap between two lugs so that the GREEN RASTER will come into the center of the screen. (Fig.3) (8) Move the deflection yoke forward, and fix the position of the deflection yoke so that the whole screen will become green. (9) Insert the wedge to the top side of the deflection yoke so that it will not move. (10) Input a crosshatch signal. (11) Verify that the screen is horizontal. (12) Input red and blue raster signals, and make sure that purity is properly adjusted.
CRT
46
WEDGE DEFLECTION YOKE
P
P/C MAGNETS
P/C MAGNETS P : PURITY MAGNET 4 : 4 POLES (convergence magnets) 6 : 6 POLES (convergence magnets)
Fig.1
PURITY MAGNETS Long lug
Short lug Bring the long lug over the short lug and position them horizontally.
Fig.2
(FRONT VIEW)
GREEN RASTER
CENTER
Fig.3
1-32 (No.52112)
|