|
|
|
Categories
|
|
Information
|
|
Featured Product
|
|
|
 |
|
|
There are currently no product reviews.
 ;
Even if the PDF is a scan, I can read the information I need.
The price is affordable and the service (mail sending) is very fast.
Thanks ! Regards. William (Fan of Kenwood)
;
Very good quality original datasheet!I like this amazing website!!!!!!
 ;
Excellent just what I needed to replace the electrolytic caps and make this old gem a beauty again. Was as scan of the original photocopied service manual.
;
It was helpful to get schematic with waveforms in important points and lot of service information. Manual is good quality, fast delivered. Of course it is hardcopy of paper one with all its disadvantages.
;
I want to give you a real heads-up for your desire to enable such people as I to acquire the information I need to maintain the older types of equipment such as this Akai HXA351W. You do a swell job with all the processes you have to perform so I can have a legible, thus usable
document which does not send me crazy trying to figure out the blurry text of a bad copy.
Very well done, Thomas.
AV-48WP74 AV-56WP74 3.8.5 VIDEO ADJUSTMENT Item A-D CONVERTER OFFSET adjustment (1) Measuring instrument Signal generator Remote control unit Test point Adjustment part [1.PICTURE/SOUND] F44 : Image adjustment F45 : Image adjustment of mode change F47 : Minimum value B at the time of detection F48 : Maximum value A at the time of detection [8.PP] ADM012 : R offset AMD013 : G offset AMD014 : B offset
Upper side of screen whole black
Description [WHITE BALANCE LOW LIGHT ADJUSTMENT for SINGLE SCREEN] (1) Input the 480i (DVD) whole black signal from the COMPONENT VIDEO terminal. (2) Select STANDARD mode with [VIDEO STATUS] (3) (4) (5) key. Select FULL mode with [ASPECT] key. Select 1.PICTURE / SOUND from SERVICE MENU. It goes into the zero mode screen of difference adjustment of color, using <F44>(Image adjustment) as 0 to 1, and using <F45>(Image adjustment mode change) as 0 to 3. Set <F47> (minimum value B at the time of detection) to 0 and <F48> (maximum value A at the time of detection) to 0.
(6)
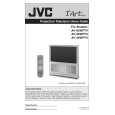
Fig. 1 <FULL screen> To be slightly whitish rather than whole black
(7) Press [MUTING] key and memorize the set value. (8) Press [BACK] key and display SERVICE MENU screen again. (9) Select 8. PP from SERVICE MENU. (10) Adjust <ADM012> (R offset setup) and <ADM014> (B offset setup) so that the adjustment result out put screen in the upper half of a screen becomes black color.(Fig.1) (11) If the screen is reddish, adjust <ADM012>(R offset setup) so that the redness is reduced to the minimum. (12) If the screen is bluish, adjust <ADM014>(B offset setup) so that the blue is reduced to the minimum. (13) Press [MUTING] key and memorize the set value. [BRIGHTNESS ADJUSTMENT for SPLIT RIGHT
Fig. 2 <SPLIT screen>
SCREEN] (1) Select STANDARD mode with [VIDEO STATUS] key. (2) Select FULL mode with [ASPECT] key. (3) Press [SPLIT] key to enter the SPLIT screen mode, then input gray scale signal on both left and right channels. (4) Select 1.PICTURE/SOUND from SERVICE MENU. (5) It goes into the Y adjustment MAX mode, using <F45> as 0 and using <F44> as 0 to 1. (6) Set <F47> to 16 and <F48> to 16. (7) Press [MUTING] key and memorize the set value. (8) Press [BACK] key and display the SERVICE MENU. (9) Select 8. PP from SERVICE MENU. (10) Adjust <ADM013> (G offset setup) so that the screen on the right upper side becomes slightly whitish rather (6% black) than whole black.(Fig.2) (11) Press [MUTING] key and memorize the set value.
(No.52105)1-55
|
|
|
> |
|