|
|
|
Categories
|
|
Information
|
|
Featured Product
|
|
|
 |
|
|
There are currently no product reviews.
 ;
We received the manual in a timely manner and it was exactly what we were expecting. Excellent replacement for original Service Manual.
All schematics are very legible. We are really satisfied.
;
We received the manual in a timely manner and it was exactly what we were expecting. Excellent replacement for original Service Manual.
All schematics are very legible. We are really satisfied.
;
We received the manual in a timely manner and it was exactly what we were expecting. Excellent replacement for original Service Manual.
All schematics are very legible. We are really satisfied.
;
We received the manual in a timely manner and it was exactly what we were expecting. Excellent replacement for original Service Manual.
All schematics are very legible. We are really satisfied.
;
We received the manual in a timely manner and it was exactly what we were expecting. Excellent replacement for original Service Manual.
All schematics are very legible. We are really satisfied.
5
6
7
8
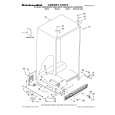
- Removing the Case (Fig.5)
A
1 2 3
Remove the two screws and then remove the Holder. Remove the screw.
3 1 3 2 3 1 3
3
Remove the five screws and then remove the Case.
B
Case
Holder
Fig.5
- Removing the Display Assy (Fig.6)
Motor Unit
1
Remove the screw.
Disconnect the connector and then remove the Motor Unit.
Switch
C
1
2 3
Remove the two screws and then remove the two Holders. Pull out the Display Assy in the arrow indicated direction.
Note) When reassembling, hold the switch down with tweezers or the like and put the Display Assy back to the Chassis. Otherwise, the switch may be damaged and not function properly.
D
2
2
Holder
3
Holder Display Assy
Fig.6
- Removing the Main Unit (Fig.7)
Bracket
2 3 1 3 3
Shaft Unit
2
E
1 2 3
Remove the screw and then remove the Bracket. Remove the four screws and then remove the Shaft Unit. Remove the three screws.
2
2
Disconnect the connector and then remove the Main Unit.
Main Unit
Fig.7
F
AVH-P6500DVD/UC
169 7 8
5
6
|
|
|
> |
|