|
|
|
Categories
|
|
Information
|
|
Featured Product
|
|
|
 |
|
|
There are currently no product reviews.
 ;
Ordered service manuel for a hard to find plasma tv - your company made it easy to find and purchase - I will use you again
Thanks for your help
 ;
This is a high quality manual with clear schematic and components layout diagrams ; with service procedure included.
;
This service manual for the Kenwood KT-990D was reproduced really well ,is very legible and manual is complete.Combined with the low price paid,in the future,I will be checking Owner-Manuals.com any time I need a manual.
;
When I purchased this manual I had my doubts regarding the quality as the price was so reasonable as compared to other outlets.
The manual itself is of high standard the print is very clear as are the diagrams. Obviously with the diagrams one has to zoom in otherwise it is to small to be able to read.
Overall I am very pleased with the company who delivered as they said and with the manual they supplied.
I occasionally require a manual and now having registered with this company I shall order from them in the future.
;
I was at first dubious about payiong for downloaded manuals but having done so, I was extremely impressed with quality of the two manual I ordered, well worth the small price I paid.
I would highly recommend these to my friends.
5
6
7
8
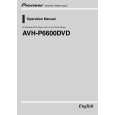
(2) Setup calibration
By touching the (+) marks on the screen one by one, their calibration results are memorized in the EEPROM.
A
[Display] 0123456789 012345678901234567890 0 1 2 3 4 5 6 7 8 9 +13 +12 +5 +4 0 1 2 3 4 5 6 7 8 9
+14
+11
+6
+3
+15 +16 +17
+10 +9
+7 +8
+2 +1
B
* Pressing any screen points far from the (+) marks is ignored. 0123456789 012345678901234567890 0 1 2 3 4 5 6 7 8 9 0 1 2 3 4 5 6 7 8 9
FINISHED
[ENTER] Return to Menu
C
* In the above figure, the numbers after (+) (from 1 to 17) shows the order where the cursor moves. * When the 17th (+) mark is pressed, "FINISHED" will be displayed. [Adjustment steps] 1) Push the 16 (+) marks one by one by following the cursor's movement. (The plus marks appear in turn on the screen. When you push one properly, the next mark will be displayed.) 2) Lastly, push the 17th (+) mark. "FINISHED" will be displayed in the center of the screen. 3) To return to the top menu, press the ENTER key on the main unit or remote control. * If you press the ESC key during adjustment, the screen mode will return to the top menu without any adjustment results stored.
E D
F
AVH-P6600DVD/UC
5 6
7
8
171
|
|
|
> |
|