|
|
|
Categories
|
|
Information
|
|
Featured Product
|
|
|
 |
|
|
There are currently no product reviews.
 ;
This service manual have great value... Recommended A+++++++
;
This service manual have great value... Recommended A+++++++
;
Great price, Quick delivery, the document was very usefull A+++++++++++++++
;
Great price, Quick delivery, the document was very usefull A+++++++++++++++
;
Great price, Quick delivery, the document was very usefull A+++++++++++++++
5
6
7
8
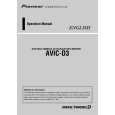
There are two methods for adjustment, a method whereby the adjustment is made while monitoring the RF waveform using the oscilloscope (method 1) and a method whereby the adjustment is made while checking the RF level in value by OSD (method 2). The adjustment procedure is shown below. Refer to the paragraph for the service test mode regarding entering of the test mode and the operation procedure. Adjustment procedure: 1. Turn the DVD mechanism module upside down so that the pick up can be adjusted. When the module is turned upside down, there is a possibility that the disc is rubbed. So, first place a coin with the thickness of approximately 1.5mm on a desk, and set the module upside down in a way that section 1 in the illustration below comes right above the coin.
A
B
2. Install the pick up. (Refer to the section regarding removal of the pick up from the mechanism unit.) As for the precautions in handling the pick up, refer to the precautions in handling the PU as described below. 3. Method 1: Connect the oscilloscope by referring to the connection drawing so that the RF signal can be monitored with AGND2 as the reference. Method 2: There is no need for setting of any equipment. Proceed to step 4. 4. Turn the power ON, and load the disc for adjustment.(GGV1018) 5. After setting the disc type to DVD layer 1 in the front end test mode, turn the power ON, and move the pick up to the inner periphery. (CRG - Home) 6. Turn the LD ON. 7. Set to focus close, and make auto adjustment for all items under that state, then set to tracking close. And make auto adjustment for all items under that state as well. 8. Make an intermediate periphery (ID: 100 000) search, and move the PU to intermediate periphery. 9. Method 1: Proceed to step 10. Method 2: After setting to Tracking Open, make all auto adjustments, and set to Tracking Close this time with a command that can be RF displayed. Make auto adjustment for all items under that state as well. 10. Use TORX driver (T2) (GGK1095) for the following. Method 1: While monitoring the RF waveform on the oscilloscope, turn SKEW adjustment screw A just a little bit in a way that the level will reach the maximum. While the pick up is at the intermediate periphery, turn SKEW adjustment screw B just a little bit in a way that the level will reach the maximum. While the pick up is at the intermediate periphery, turn SKEW adjustment screw A just a little bit in a way that the level will reach the maximum. (Make adjustment in the order of A -> B -> A, Please end the each adjustment by turning screw clockwise. ) Method 2: While monitoring the RF level value on the OSD display, turn the SKEW adjustment screw A just a little bit in a way that the level will reach the maximum. While the pick up is at the intermediate periphery, turn SKEW adjustment screw B just a little bit in a way that the level will reach the maximum. While the pick up is at the intermediate periphery, turn SKEW adjustment screw A just a little bit in a way that the level will reach the maximum. (Make adjustment in the order of A -> B -> A, Please end the each adjustment by turning screw clockwise. ) If the error rate is not good, please perform Method 1 again. 11. Turn the power OFF in the test mode, and after confirming that the disc has stopped, eject the disc. 12. Apply adhesive for fixing the SKEW and lock the screw. Refer to the illustration below for the adhesion points.
F C
D
E
AVIC-D3/XU/UC
5 6
7
8
171
|
|
|
> |
|