|
|
|
Categories
|
|
Information
|
|
Featured Product
|
|
|
 |
|
|
There are currently no product reviews.
 ;
Great Manual. It was exactly what I was looking for
;
Great Manual. It was exactly what I was looking for
;
I am really satisfied. It was ceap, easy and quick. Te owner manual is a full service book. I got what I expected. Thx
;
The service was good but it just a little late for the download. It seems that it needs to clear the payment but the payment was settled by paypal. As far as my concern, it should be able to download after the confirmation of sold.
;
Great quality manual, fast service, excellent seller... Thanks !!!
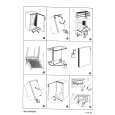
� Take out the SPEAKER GRILLE. � Take out the FRONT CONTROL BOX. � Take out the SCREEN ASS'Y. (1) Remove 9 screws [ J ] attaching the mirror brackets of the upper, left and right side. (2) Raise slightly to disengage of the mirror from the bottom bracket. (If necessary, loosen the screws attaching the bottom bracket) (3) Take out the MIRROR. NOTE : � The MIRROR is frontcoated. Do not touch the front of the MIRROR. � At least 2 persons are recommended for removable and reassemble.
MIRROR
J
BRACKET MIRROR BRACKET
Fig.4 3.1.8 REAR PANEL (1) Remove 6 screws [ K ]. (2) Remove 4 screws [ L ]. (3) Take out the REAR PANEL. 3.1.9 PARTITION � Take out the REAR PANEL. (1) Pull out the PARTITION backward.
PARTITION
K
L
3.1.10 REAR COVER � Take out the SPEAKER GRILLE. � Take out the FRONT CONTROL BOX. � Take out the SCREEN ASS'Y. (1) Remove 2 screws [ M ]. (2) Remove 2 screws [ N ] from front side. (3) Slightly pull for backside to disengage of the REAR COVER from hooks. (4) Take out the REAR COVER. NOTE : � Because of the large size, at least two persons are recommended for removal and reassemble.
REAR PANEL
Fig.5
REAR COVER
N
M
N
HOOK BRACKET
Fig.6
(No.YA166)1-11
|
|
|
> |
|