|
|
|
Categories
|
|
Information
|
|
Featured Product
|
|
|
 |
|
|
There are currently no product reviews.
 ;
Thank´s for your help, I already recived these manual from you
;
Thank you for your manual It has the basic things to and i use the Oszi for Longer Time.
THX
;
Actually, I was looking for this information for 3 years!...now thanks to you, the manual is on my hands and of great help, cause I understand now where I was doing wrong connections and wires...excellent, I'll be back to you if in need, thank you.
 ;
This manual covers the main equipment features only. While it also includes the procedure for saving and loading from the now long obsolete memory cards it does not mention the how to operate with the optional floppy drive interface so I am still at a loss about how to use this! Note that there is a separate manual covering the MIDI interface and programming via the keyboard, not included in this download. You will also need to get hold of this if you want to use the MIDI interface properly. Basically there is little difference between this manual and the free to download manual for the similar PR60 model.
;
Good list of manuals. I found a very rare one and easily get. Should be promptly to download, as we must to wait hours even after confirmed payment.
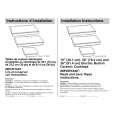
Réglage des pieds
Installez l�appareil sur une surface plane, à proximité des connexions électriques, d�eau et d�évacuation. Compensez les petites inégalités du sol en réglant les pieds de l�appareil (n�insérez sous les pieds ni morceau de bois, ni carton, etc.) : 1.Desserrez le contre-écrou à l�aide de la clé fournie. 2.Réglez la hauteur du pied à la main. 3.Resserrez le contre-écrou en le tournant dans le sens inverse des aiguilles d�une montre.
Assurez-vous que les quatre pieds reposent tous correctement sur le sol et que la machine est bien horizontale et stable (avec un niveau). L�appareil peut être installé dans un espace de 40 cm de largeur et de 63 cm de profondeur. Remarque : si vous installez la machine sur de la moquette épaisse, veuillez garantir un espace sous la machine pour permettre à l�aide de circuler, en réglant les pieds.
Raccordement du tuyau d�arrivée d�eau
1.Vissez soigneusement le tuyau d�arrivée sur le robinet, à la main. 2.Vérifiez que le tuyau n'est pas plié. 3.Vérifiez l�étanchéité des raccordements du robinet et de la machine en ouvrant le robinet à fond. Si le tuyau n�est pas suffisamment long, remplacez-le par un tuyau de longueur suffisante résistant à la pression (minimum 1000 kPa - en conformité avec EN 50084). Vérifiez régulièrement que le tuyau d�arrivée ne présente ni signes de fragilisation, ni fissures. Le cas échéant, remplacez-le. La machine à laver peut être branchée sans clapet antiretour.
16
|
|
|
> |
|