|
There are currently no product reviews.
 ;
Copy of genuine owners/operators manual, very useful
;
The manual was a perfect match and was exactly what I was looking for. I'm very satisfied with my purchase.
;
Thank you for having the manual I needed for an older model Aiwa stero I had found on Ebay --- I wanted the Aiwa because I had tapes and cd's but I did not have a manual as to how to operate the system... I found what I needed and it has enabled me to set the system up for my enjoyment.
;
I wished detailed information of the JBL S310 and here I found it! Very happy with the service from this site!
;
The manual was very helpfull, it answerdes all my questions, and i was surprized to find the original manual on this site! Big thumbs uP:)
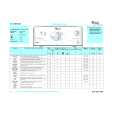
NETTOYAGE ET ENTRETIEN
R�CUP�RATION D�UN OBJET TOMB� ENTRE LE TAMBOUR ET LA CUVE
Si un objet tombe accidentellement entre le tambour et la cuve, vous pourrez le récupérer grâce à une aube amovible : 1. Débranchez l�appareil. 2. Retirez le linge du tambour. 3. Fermez les portes du tambour et faites tourner le tambour dans le sens opposé des portes. 4. Faites glisser l�aube en appuyant sur le téton en plastique comme indiqué sur la figure cicontre. Celle-ci tombera dans le tambour. 5. Ouvrez le tambour : vous pouvez récupérer l�objet qui est dans le tambour à travers l�orifice. 6. Replacez l�aube du tambour par l�intérieur : Placez les extrémités en plastique audessus du trous sur le côté droit du tambour. Faites ensuite glisser l�aube en plastique de droite à gauche jusqu�à ce qu�elle se clipse. 7. Rebranchez l�appareil.
13
|