|
|
|
Categories
|
|
Information
|
|
Featured Product
|
|
|
 |
|
|
There are currently no product reviews.
 ;
Came in the mail within a few hours. Gave clear instruktion on maintaines. Is of great use to have this manual in house
 ;
Easy to access. Clear instructions. No problems. Printed fine.
;
Great scan but please note that it is entirely in GERMAN.
;
High quality scan of the manual, very quick and easy download and very important, a truly honest price. thanks
;
Minden rendben, de két megjegyzés, az ábrák nehezen kivehetők és a fizetés után 24 órát kell várni a letöltésre.
3gb05305.fm Page 14 Thursday, March 18, 2004 3:09 PM
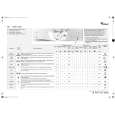
Detergent dispenser
1. Press the release lever in the prewash compartment downward and remove the drawer. 2. Remove the insert (model �A� and �B1�) or siphon (model �B2�) from the softener compartment. Remove the insert for liquid detergents. For model �A� only remove also the siphon from the chlorine bleach compartment. 3. Wash all the parts under running water. 4. Replace the parts and refit the detergent dispenser. Insert the detergent dispenser in the washing machine.
A A
B1
B2
Mesh Filter in the Water Connection
Check and clean regularly. For washing machines with a straight inlet hose 1. Turn off the tap and unscrew the water inlet hose from the tap. 2. Clean the internal mesh filter and screw the water inlet hose back onto the tap. 3. Now unscrew the inlet hose on the rear of the washing machine. 4. Pull off the mesh filter from the washing machine connection with universal pliers and clean it. 5. Refit the mesh filter and screw the inlet hose on again. 6. Turn on the tap and ensure that the connections are completely water-tight. For washing machines with Water Stop hose 1. Turn off the tap and unscrew the Water Stop hose from the tap. 2. Clean the internal mesh filter and screw the water inlet hose back onto the tap. 3. Turn on the tap and ensure that the connection is completely water-tight. 14
|
|
|
> |
|