|
|
|
Categories
|
|
Information
|
|
Featured Product
|
|
|
 |
|
|
There are currently no product reviews.
 ;
Great price, Quick delivery, the document was very usefull A+++++++++++++++
;
Thank´s for your help, I already recived these manual from you
;
Thank you for your manual It has the basic things to and i use the Oszi for Longer Time.
THX
;
Actually, I was looking for this information for 3 years!...now thanks to you, the manual is on my hands and of great help, cause I understand now where I was doing wrong connections and wires...excellent, I'll be back to you if in need, thank you.
 ;
This manual covers the main equipment features only. While it also includes the procedure for saving and loading from the now long obsolete memory cards it does not mention the how to operate with the optional floppy drive interface so I am still at a loss about how to use this! Note that there is a separate manual covering the MIDI interface and programming via the keyboard, not included in this download. You will also need to get hold of this if you want to use the MIDI interface properly. Basically there is little difference between this manual and the free to download manual for the similar PR60 model.
30105868GB.fm Page 12 Monday, May 8, 2006 6:15 PM
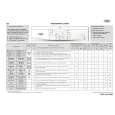
REMOVING THE FILTER
We recommend that you check and clean the filter regularly, at least two or three times a year.
A
Especially:
� If the appliance is not draining properly or if it fails to perform spin cycles. � If the pump is blocked by a foreign body (e.g. buttons, coins or safety pins). IMPORTANT: make sure the water has cooled before draining the appliance. 1. Stop the appliance and unplug it. 2. Remove the plinth by using the separator of the detergent dispenser (fig. �A�). 3. Place a container beneath it. 4. Open the filter but do not remove it completely. Slowly turn the filter counterclockwise (fig. �B�) until the water begins to drain out. 5. Wait until all the water has drained. 6. Now unscrew the filter completely and remove it. 7. Clean the filter and the filter chamber. 8. Check that the pump rotor moves freely. 9. Re-insert the filter and screw it in clockwise as far as it will go. 10. Pour about 1 litre of water into the detergent drawer to reactivate the �Eco system�. Check that the filter is inserted properly and securely. 11. Reinstall the plinth. 12. Plug in the appliance again. 13. Select a programme and start it.
B
DRAINING RESIDUAL WATER
Before emptying the residual water, switch the appliance off and unplug it from the mains socket. Remove the plinth. Place a container beneath it. 1. Open the filter but do not remove it completely. Slowly turn the filter counterclockwise until the water begins to drain out. 2. Wait until all the water has drained. 3. Now unscrew the filter completely and remove it. 4. Tilt the appliance forwards carefully to allow the water to flow out. 5. Re-insert the filter and screw it in clockwise as far as it will go. 6. Reinstall the plinth. Before using the washing machine again: 1. Pour approx. 1 litre of water into the detergent drawer to reactivate the �Eco system�. 2. Plug in the appliance again. 12
Black process 45.0° 100.0 LPI
|
|
|
> |
|