|
|
|
Categories
|
|
Information
|
|
Featured Product
|
|
|
 |
|
|
There are currently no product reviews.
 ;
Hello from Germany - thank you very much for the manual for my Sharp "Searcher" - the handling of your internet area is outstanding..Mike
;
I am very happy with the owner's manual. I bought a used Casio and was so relieved that I was able to get a hold of a owner's manual. It was very easy to download the manual and I had no problems with printing it. Thank you! Nancy Whalen
;
The purchased manual is an high-quality scan of the original JVC paper-based Owner´s Manual. I am very satisfied!
;
Very satisfied with received document, all is right, Thank You very much, it was a Pleasure to work with You.
 ;
great site, the most easy and fastest way to find the manual you need, no 5 star because the manual was only available in german, but I speak german as well so no problem for me.
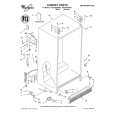
INSTALLATION INSTRUCTIONS
INSTALLATION
� � Install the appliance on a solid and level floor surface, preferably in a corner of the room. Make sure that all four feet are resting firmly on the floor and check that the appliance is perfectly level (use a spirit level). If the floor is uneven, adjust the levelling feet as required (do not insert pieces of wood, cardboard etc. under the feet).
�
1. Slacken the locknut using the spanner supplied. 2. Adjust the height of the foot, turning it by hand. 3. Tighten the locknut anticlockwise towards the washing machine. � If the appliance is to be installed on a wooden floor, distribute the weight by placing it on a 60 x 60 cm sheet of plywood at least 3 cm in thickness. Secure the plywood sheet to the floor. 1 2
3
BUILD-UNDER / WORKTOP
The appliance must be installed only under a fitted, continuous kitchen worktop. The appliance must only be built under using the built under set UBS. � Unplug the appliance from the mains. 1. Unscrew the worktop fixing screws from the rear of the appliance. 2. Slide the worktop fully backward and lift it upwards to remove. Install the cover panel following the relative instructions. 3. Refit the fixing screws and tighten them.
1
BUILD-UNDER OPENING DIMENSIONS
Width Height Depth 600 mm 825 mm 600 mm 2 3
WARNING: Only plug the machine into the mains power socket after you have fitted the cover panel or the machine worktop.
21
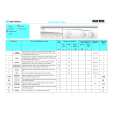 $4.99 AWV 465 IGNIS
Quick Start Quick start guide ( sometimes called quick guide ) contains most important information on how to use…
|
|
|
> |
|