|
|
|
Categories
|
|
Information
|
|
Featured Product
|
|
|
 |
|
|
There are currently no product reviews.
 ;
Was happy to find the complete owners manual... It's all in there, just like the original...
;
Thanks for offering this item at such a good price. Proved handy in identifying the part I was looking for my set.
;
Thr Video Recorder i have is quiet Old and the Producer could Not help me. So i w as very glad to find an offer for the owners Manual for a very fair Price.a I obtained the original Manual very quick and I am happy to have it now.
 ;
The PDF copy was immediately available on download after the payment. However, I noticed that the document was in German, and Ihad to contact a German translator to get it translated it to English. The quality of document is legible can be used for my purpose.
;
The manual was complete and of great quality. Originally a tri-lingual file, I first received only one language. After a note to owners-manuals.com, I quickly received the remaining languages... Great service, definitely worth it.
INSTALLATION INSTRUCTIONS
WATER SUPPLY
� Water supply: cold water only � Tap: 3/4� threaded hose connection � Pressure: 100-1000 kPa (1-10 bar). Should the appliance be installed in a room which is subject to extremely low temperatures, you need to empty water at the end of each wash programme. Please follow the instructions given in the chapter titled �Draining Residual Water� and disconnect the water inlet hose.
WATER INLET HOSE(S)
1. Carefully screw the hose connection to the tap preferably by hand. Make sure there are no kinks in the hose and that it is not crushed. 2. Check water-tightness of tap and appliance connections by turning the tap completely on. � If the hose is too short, replace it with a suitable length of pressure resistant hose (1000 kPa min., EN 50084 approved type). � The appliance can be connected without a non-return valve. � Install the appliance in accordance with regulations of your local water company. For Great Britain & Ireland only: Water inlet: - hot (see A) fill hose; - and cold (see B) fill hose. The warm water inlet temperature must not exceed 60° C.
19
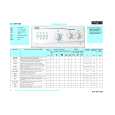 $4.99 AWV 808 IGNIS
Quick Start Quick start guide ( sometimes called quick guide ) contains most important information on how to use…
|
|
|
> |
|