|
|
|
Categories
|
|
Information
|
|
Featured Product
|
|
|
 |
|
|
There are currently no product reviews.
 ;
Great manual, would not have been able to operate my machine without it!!
James Dawson August 18, 2012
;
excellent value & price! Includes everything you need to know about the NN-C777! I would buy this again.
;
Very satisfied! I was searching for several days, but nope; till I discovered your webside and there it was at a very reasonable price. Keep up the good work!
Paul
Flanders
 ;
Generally speaking good copy; a few pages too hard contrast...
Good service and communication.
;
I purchased the unit from a private party and the original owners manual was not available. Having the ability to download it was extremely helpful and clarified operating the equipment immensely. This is a complicated unit and without the manual I would not have been able to maximize it's potential. Thank you.
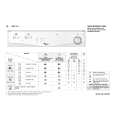
BESCHREIBUNG DES TROCKNERS
1. Arbeitsfläche 2. Kontaktstift 3. Tür �ffnen der Tür: Am Griff ziehen Schlie�en der Tür: Leicht bis zum Anschlag zudrücken. 4. Flusensieb
1 2 4 3
ABLUFTANSCHLUSS
Abhängig vom Gerätemodell befindet sich der Abluftschlauch zusammen mit einem Adapter in der Trommel. Hinweis: Falls der Abluftschlauch nicht mitgeliefert wird, können Sie den bei Ihrem Händler erhältlichen Zubehörsatz AMH 577 verwenden.
Montage des Abluftschlauchs
1. Legen Sie ein Handtuch oder das Verpackungsmaterial rechts neben den Trockner. 2. Kippen Sie den Trockner rechtsseitig auf das Handtuch oder das Verpackungsmaterial. 3. Drücken Sie den Adapter in den Schlauch (siehe Abbildung). Schieben Sie den Adapter auf das Anschlu�stück im Trocknerboden und verrasten Sie den Adapter (siehe Abbildung). Abluftführung ins Freie � Führen Sie den Abluftschlauch ohne ihn abzuknicken ins Freie (Innendurchmesser 10 cm, maximale Länge mit zwei Bögen 3 m). � Stellen Sie sicher, dass der Abluftschlauch bei Installation auf einer Waschmaschine nicht durchhängt und eingeklemmt wird. Er sollte stets waagerecht oder nach oben weisend angebracht werden. � Schlie�en Sie den Abluftschlauch nicht an mit Fliegengittern geschützte Abluftsysteme an. Diese können sich zusetzen und eine Betriebsstörung des Trockners verursachen. � Schlie�en Sie den Abluftschlauch nicht an ein Kaminsystem an. � Schlie�en Sie den Abluftschlauch nicht an das Heizungssystem an. Schlie�en Sie den Schlauch nur an feuchtigkeitsisolierte Abluftsysteme an. Betrieb des Trockners ohne Abluftschlauch � Verwenden Sie den Trockner nur in gro�en und gut belüfteten Räumen. � Halten Sie den Raum frei von Staub. Zwischen der Trocknerrückseite und der Stellwand muss ein Mindestabstand von 10 cm eingehalten werden. 7
|
|
|
> |
|