|
|
|
Categories
|
|
Information
|
|
Featured Product
|
|
|
 |
|
|
There are currently no product reviews.
 ;
It was a complete manual as stated. Very good source for older product manuals. Thanks
;
Scan quality is very good. Price is very reasonable. If you're looking to purchase a copy of this manual, this is the one to get.
 ;
Perfect for my use.Could have better pictures,but otherwise perfect ;)
;
This is one of four manuals I have downloaded recently.
Purchase was very straight forward and the authorising email arrived in about 4 hours.
The quality of the scan is good. Print is clear and square to the page edges.
;
Exactly as advertized. High quality digital copy of the Nak 610 user manual. Easy download and access. Highly recommended.
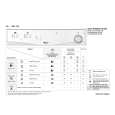
PREPARING THE LAUNDRY 1. Check that all fastenings are closed and that pockets are empty. 2. Turn the articles inside out. 3. Place laundry loosely in the drum to make sure it doesn�t become tangled. Sort laundry as follows: A) By care symbols (on the collar or inside seam): Suitable for tumble drying Tumble drying with reduced drying intensity only Do not tumble dry B) By amount and thickness/weight Whenever the load to be dried exceeds dryer capacity, separate laundry according to weight (e.g. towels from thin underwear). C) By type of fabrics Cotton/linen: towels, cotton jersey, bed and table linen made of cotton or linen. Synthetics/Easy Care: blouses, shirts, overalls, etc. made of polyester or polyamide, as well as cotton/synthetic mixes. D) By drying level � Sort into: iron dry, cupboard dry, etc. Do not tumble dry: woollens, silk, nylon stockings, delicate embroidery, fabrics with metallic decorations, bulky items such as sleeping bags, etc. Important: only use specific indicated dryersafe additives and rinse items that have been treated with stain remover thoroughly in plenty of water before drying. Only use specific indicated dryer-safe plastic items and never dry rubber or articles contaminated with vegetable oil in the dryer.
SELECTING A DRYING TIME OR A PROGRAMME, AND OPTIONS Drying Time or Programme and Options: � To select a drying time or a programme, turn the time selector knob clockwise. � � To select an option (if available), press the corresponding button. Press the button again to cancel the option.
FILTER Clean the lint filter at the end of every drying cycle: 1. Open the door. 2. Pull the filter upwards. 3. Remove lint using a soft brush or your fingertips. 4. Push the filter firmly back into place. BUILT-IN INSTALLATION To built in the dryer 1. It is recommended to not remove the worktop. 2. Connect the dryer to an external ventilation system in order to prevent steam from damaging your furniture during the years. TROUBLESHOOTING GUIDE If a fault occurs, before contacting our AfterSales Service, make the following checks to try and remedy the problem: Drying takes too long / laundry is not dry enough: � Was the correct drying time selected? � � Was the inserted laundry too wet (Washing machine spin speed less than 800 rpm)? Is the lint filter dirty (filter indicator lamp on)?
AFTER-SALES SERVICE If, after carrying out the above checks the malfunction persists or appears again, turn the dryer off and call our After-Sales Service (refer to guarantee). Please specify: � � � The nature of the fault. The dryer type and model. The service code (the number after the word Service on the adhesive rating plate) on the right-hand side when the door is open. Your full address and phone number.
STARTING AND COMPLETING A DRYING CYCLE 1. Having selected the desired drying time or programme and options, press the Start button. If the laundry is not removed at the end of the drying cycle, an automatic anti-crease cycle will operate for maximum 12 min. The drum rotates at regular intervals, preventing the laundry from creasing. 2. On completion of the drying cycle, set the time selector knob to position �0�. The dryer indicator lamp �On� switches off. INTERRUPTING A DRYING CYCLE To interrupt the dryer during operation 1. Set the time selector knob to the programme �Airing�. 2. Wait at least 5 minutes before opening the door to allow the dryer to cool down. For your safety the drying time stops automatically if you open the door. 3. To restart, after door opening, close the door and press the Start button again.
�
The dryer does not operate: � Is the power plug properly inserted into the mains electricity socket? � � Is there a power failure? Has the fuse blown?
� Is the door properly closed? � Has the drying time been selected? � Has the Start button been pressed? Lint filter indicator lamp on: � � Is the lint filter clean? Is the vent hose blocked?
5019 307 00034
|
|
|
> |
|