|
There are currently no product reviews.
 ;
Très satisfait ! envoi rapide, Grand catalogue disponible. Many thanks !
;
Delivery came quite promptly and in a very readable format. Thank you.
;
I found my Clarion VRX8370R in the Camper I bought and I wasn't able for month to understand it.
The Owner Manual was perfect and just what I was searching for.
Thank you.
Leonardo
;
Very good copy of Manual, clear and easy to print off, arrived very promptly and reasonably priced.
Thanks, I will use you again.
;
Zeer duidelijke afdrukken op A4-formaat , zeer uitgebreide handleiding . Pluspunt ,zeer snelle
respons van jullie , binnen de 24h . Top !!!
CONDENSEUR
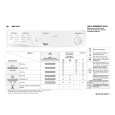
Avant le nettoyage ou toute intervention sur le sèche-linge, mettez-le hors tension. Nettoyez le condenseur au moins tous les trois mois en procédant comme suit : A. Ouvrez la porte et appuyez sur le bouton d�ouverture du volet du condenseur situé en bas du cadre de la porte. B. Le volet du condenseur s�ouvre. C. Soulevez la poignée du condenseur pour la mettre à l�horizontale et sortez le condenseur de son logement. D. Nettoyez le condenseur à l�eau courante en le retournant pour atteindre tous les recoins. E. Essuyez la poussière et les peluches déposées sur les joints et le condenseur. F. Retirez les peluches amassées dans le logement du condenseur. Veillez à ce que l�orifice d�évacuation (partie avant gauche du logement) ne soit pas bouché par des peluches. G. Remettez le condenseur en place dans son logement (repère TOP ou HAUT vers le haut) et appuyez sur la poignée. H. Fermez le volet. Les plaques en aluminium du condenseur peuvent se décolorer avec le temps.
A
B
C
D
8
|