|
|
|
Categories
|
|
Information
|
|
Featured Product
|
|
|
 |
|
|
There are currently no product reviews.
 ;
So usefull to make my installation a breeze. 5 stars on quality.
;
very helpful, the information in these manuels are very detailed
;
Please tell us what you think and share your opinions with others. Be sure to focus your comments on the product. You will receive $2.00 of store credit for Your review.
;
Please tell us what you think and share your opinions with others. Be sure to focus your comments on the product. You will receive $2.00 of store credit for Your review.
;
Good copy and great customer service! There was some confusion with my order and it was resolved promptly!
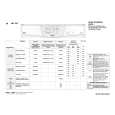
CONDENSEUR
Avant le nettoyage ou toute opération de maintenance, mettez le sèche-linge hors tension. Nettoyez le condenseur au moins tous les trois mois en procédant comme suit : 1. Ouvrez la porte et appuyez sur le bouton du volet du condenseur situé en bas de l�ouverture de la porte. 2. Le volet du condenseur s�ouvre. 3. Déverrouiller le condenseur en tirant la poignée pour la soulever et la sortir de son logement. 4. Enlevez les résidus et les peluches déposés sur les joints et le logement du condenseur. 5. Nettoyez le condenseur sous l�eau courante. 6. Veuillez à garder toujours propre (sans peluches) le logement du condenseur en nettoyant à l�aide d�un chiffon humide. 7. Remettez le condenseur en place en respectant l�orientation du sigle TOP en haut et appuyez sur la poignée pour verrouiller le condenseur. 8. Fermez le volet. Les plaques en aluminium du condenseur peuvent se décolorer avec le temps.
1 2
3
4
9
|
|
|
> |
|