|
There are currently no product reviews.
 ;
Found website easy to use and manual very clear. First class service
 ;
The quality is quite good and clear. Nothing of the informations inside is lost during the digitalizing process
;
Very good service, fast downloads and good manuals.
;
Good qulity. Even as it is an old manual (from 1991-1992) it has a good scanned quality and is complete, including user's manual, disassembly intructions, diagrams and schematics, ajustments, troubleshooting and parts list, as usual with SONY manuals and Owner-manuals service.
;
tres bon document
cela a permis de verifier la connection de l'ecran
merci
salutations
AX-F300
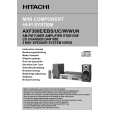
4. Removal of CD Mechanical-Unit Assembly, Main P. W. Board and Motor P. W. Board
(1) Remove one each of screws and from the main P. W. board on the side. (2) Remove 2 screws from the top side of the mechanical unit. (3) Remove 2 screws from the bottom side of the chassis. (4) Remove the connectors , , and of the main P W. board. . (5) Remove the connector of the P T. P W. board. . . (6) Remove 1 screw from the top side of the P T. cover and detach the power transformer from the chassis. . (7) Remove 1 screw of the ground wire. (8) Remove the connectors , and of the motor P W. board from the main P. W. board. . (9) Remove 2 screws from the motor P. W. board. (10) Remove the solder from the four places of the soldering section of the motor. (11) Remove the connectors PG402 and 403 of the motor P W. board. .
PG402 PG403
�7�
|