|
There are currently no product reviews.
 ;
Clear and concise. Saved me a lot of time and money.
;
Superb manual. Exactly what I ordered and made available in a very timely manner.
 ;
very fast detailed and accurate hope to do business again
;
This was precisely what I was looking for. Complete and good quality!
;
This is the ONLY copy of this manual I could find for a realistic price. Even Panasonic could not provide me with one.
The PDF is a very good copy and it helped me diagnose and find the fault with the unit I have.
AX-F300
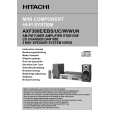
4. Removal of CD Mechanical-Unit Assembly, Main P. W. Board and Motor P. W. Board
(1) Remove one each of screws and from the main P. W. board on the side. (2) Remove 2 screws from the top side of the mechanical unit. (3) Remove 2 screws from the bottom side of the chassis. (4) Remove the connectors , , and of the main P W. board. . (5) Remove the connector of the P T. P W. board. . . (6) Remove 1 screw from the top side of the P T. cover and detach the power transformer from the chassis. . (7) Remove 1 screw of the ground wire. (8) Remove the connectors , and of the motor P W. board from the main P. W. board. . (9) Remove 2 screws from the motor P. W. board. (10) Remove the solder from the four places of the soldering section of the motor. (11) Remove the connectors PG402 and 403 of the motor P W. board. .
PG402 PG403
�7�
|