|
|
|
Categories
|
|
Information
|
|
Featured Product
|
|
|
 |
|
|
There are currently no product reviews.
 ;
Super nice! Good to have a manual in digital format.
;
Great job supplying the manual.
Many of these products weerepretty obscure, so it was great that you had
the manual for it!
;
Great manual, would not have been able to operate my machine without it!!
James Dawson August 18, 2012
;
excellent value & price! Includes everything you need to know about the NN-C777! I would buy this again.
;
Very satisfied! I was searching for several days, but nope; till I discovered your webside and there it was at a very reasonable price. Keep up the good work!
Paul
Flanders
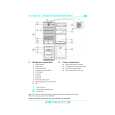
Table Kerf Insert BB1201 WARNING Read and understand the manual for the use of the tool with this accessory.
1. Unplug the saw. Lower the head assembly and lock into position. Remove the six (6) kerf insert screws using the Phillips screw driver (Figure 1). Remove kerf insert and replace with new kerf insert. Insert the six (6) kerf insert screws and tighten.
4 5 5
Kerf Insert Screws
2.
3. 4.
Cutting Kerf Inserts
Kerf Insert NOTE: New inserts need to be cut initially to provide blade clearance. This should be done by carefully making a straight cut through the insert.
4 0
5
Figure 1. Kerf Insert
! AVERTISSEMENT
Il convient de lire et de comprendre le manuel pour l'utilisation de l'outil avec cet accessoire.
Insert de Trait de Scie de Table BB1201
1. Débranchez la scie. Abaissez la tête et bloquez en place. 2. Desserrez les six (6) vis d�encoche à l�aide d�un tournevis à empreinte cruciforme (Figure 1). 3. Retirez l'insert de trait de scie et remplacez-le par un nouvel insert de trait de scie. 4. Insérez les six (6) vis d'insert de trait de scie et serrez. Vis d�encoche
5
Coupe des inserts d�encoche
REMARQUE : Les nouveaux inserts doivent être coupés initialement afin d�assurer une espace suffisante autour de la lame. Ceci doit être fait en pratiquant soigneusement une coupe droite à travers l'insert.
4 0 0 4 4 0 3 5 1 6 5 3
Inserts d�encoche
3
3 0 0 3 5 2 5
Figure 1. Insert d�encoche
Accesorios de Inserción de la Mesa Para la Separación de Corte BB1201 !
ADVERTENCIA
Lea y entienda el manual para el uso de la herramienta con este accesorio.
4
1. Desenchufe la sierra. Baje el ensamblaje del cabezal y fÃjelo en su sitio. 2. Afloje los seis (6) tornillos del accesorio de inserción para la separación de corte usando el destornillador Phillips (Figura 1). 3. Quite el accesorio de inserción para la separación de corte y reemplácelo con uno nuevo. 4. Introduzca los seis (6) tornillos del accesorio de inserción para la separación de corte y apriételos. Tornillos del accesorio de inserción para la separación de corte
Corte de accesorios de inserción para la separación de corte
NOTA: Hay que cortar inicialmente los accesorios de inserción nuevos para proporcionar un espacio libre para la hoja. Esto se debe hacer con cuidado haciendo un corte recto a través del accesorio de inserción.
2 610 995 765 4/98
Figura 1. Accesorio de inserción para la separación de corte
PRINTED IN U.S.A.
6 5 3 5 1 30 03
Accesorios de inserción para la separación de corte
2
5 5 2 5 2 2 0
1 50 01
0 10 55
2 2 0 1 5 5 1 0
1 0
1
|
|
|
> |
|