|
|
|
Categories
|
|
Information
|
|
Featured Product
|
|
|
 |
|
|
There are currently no product reviews.
 ;
Everything is OK. Owner's Manual I downloaded ( I get link for it by email).
;
The only reason I gave this less than 4 stars, is because it shouldn't take 24 hrs to have the download available. I was surprised to find that I had to wait until the next day to be able to download the manual that I paid for.
The manual itself is the correct manual.
 ;
Excellent replacement for original Owner´s Manual. I am totally satisfied!
;
Great service. Manual is as advertised and delivered when promised.
;
Perfect quality, highly appreciated service !!!
Fast delivery of the download info, no issues at all. Recommended E-manual shop !!!
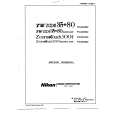
INTERFACE
FRONT VIEW VUE AVANT
INTERFACE
SCHNITTSTELLE
VORDERANSICHT
1 Disc Tray
Open the loading tray by pressing the eject button, then place a BD or DVD disc into the slit with the label facing up. Press the eject button to load the tray with the disc. Do not attempt to pull out the disc tray forcibly.
1 Tiroir du disque
Ouvrir le tiroir de chargement en appuyant sur la touche d�éjection, puis placez un BD ou un DVD dans l�emplacement prévu avec l�étiquette tournée vers le haut. Appuyer sur la touche d�éjection pour charger le disque. N�essayez pas de retirer de force le plateau du disque.
1 Disc-Schublade
�ffnen Sie die Schublade, indem Sie die Eject-Taste drücken. Legen Sie dann eine BD oder DVD in den Schlitz, wobei die Beschriftung oben liegt. Drücken Sie die Eject-Taste, um die Schublade mit der Disc zu laden. Versuchen Sie auf keinen Fall, das Disc-Fach gewaltsam herauszuziehen.
2 BUSY Indicator
Operation status is indicated as follows. During reading Lights During writing Lights
2 Voyant BUSY (occupé)
L�état de fonctionnement est signalé comme suit: Pendant la lecture S�allume Pendant l�écriture S�allume
2 Besetzt-Anzeige (BUSY)
Diese Anzeige kennzeichnet den aktuellen Betriebsstatus wie folgt. Während des Lesens: Leuchtet Während des Schreibens: Leuchtet
3 Ventilation Hole
Do not block this part.
3 Orifice de ventilation
Ne pas obstruer ces éléments.
4 Eject Button (0)
To unload /load the disc, press the button.
3 Lüftungsöffnungen
Dieser Teil darf nicht verdeckt werden.
4 Touche d�éjection (0)
Pour décharger / charger le disque, appuyer sur la touche.
5 Forced Ejection Hole
Insert a stiff rod into the hole and push to eject the tray when the tray doesn�t unload by pressing the Eject button. In the normal operation, the eject button should be used to unload the tray. Make sure the power of the drive is turned off and wait more than one minute till the disc rotation is stopped when access the eject hole.
4 Eject-Taste (0)
Drücken Sie diese Taste, um die Disc einzulegen bzw. herauszunehmen.
5 Orifice d�éjection forcée
Insérer une tige rigide dans l�orifice et pousser pour éjecter le tiroir lorsque celui-ci ne s�ouvre pas lors d�un appui sur la touche d�éjection. En fonctionnement, utiliser uniquement la touche d�éjection pour ouvrir le tiroir. Veiller à ce que l�alimentation du lecteur soit coupée et attendre l�arrêt de la rotation du disque pendant plus d�une minute avant de tenter d�éjecter le tiroir au moyen de l�orifice d�éjection.
5 Loch für erzwungenen Auswurf
Wenn die Schublade nach dem Drücken der Eject-Taste nicht ausfährt, führen Sie eine unbiegsame Stange in das Loch ein und drücken sie, um die Disc auszuwerfen. Im normalen Betrieb wird eine Disc mittels Eject-Taste ausgeworfen. Achten Sie vor dem Zugriff auf das Auswurfloch darauf, dass die Netzversorgung des Laufwerks ausgeschaltet ist, und warten Sie länger als eine Minute, bis sich die Disc nicht mehr dreht.
ist eine Marke von Blu-ray Disc Association. ist eine Marke von DVD Format/Logo Licensing Corporation.
est une marque de fabrique de Blu-ray Disc Association. is a trademark of Blu-ray Disc Association. is a trademark of DVD Format/Logo Licensing Corporation. est une marque de fabrique de DVD Format/Logo Licensing Corporation.
Precautions on playing 8 cm (3.15") Discs
÷ 8 cm disc adapters cannot be used with this unit. ÷ When this unit is installed flat, 8 cm discs may be used by placing them in the 8 cm disc depression in the center of the disc tray. ÷ When this unit is installed vertically, 8 cm discs cannot be used.
Précautions à prendre lors de la lecture de disques de 8 cm
÷ Les adaptateurs de disque de 8 cm ne sont pas utilisables avec cet appareil. ÷ Si cet appareil est posé à plat, vous pouvez lire des disques de 8 cm en les plaçant dans la cavité pour disques de 8 cm, prévue au centre du plateau à disque. ÷ Si cet appareil est posé verticalement, la lecture de disques de 8 cm n�est pas possible.
Vorsichtmassnahmen beim abspielen von 8-cm-Discs
÷ Adapter für 8-cm-Discs können nicht mit diesem Gerät verwendet werden. ÷ Bei Installation dieses Gerätes in horizontaler Lage können 8cm-Discs verwendet werden, indem sie in die für 8-cm-Discs vorgesehene Vertiefung in der Mitte des Disc-Fachs eingelegt werden. ÷ Bei Installation dieses Gerätes in vertikaler Lage können 8cm-Discs nicht verwendet werden.
�5�
|
|
|
> |
|