|
There are currently no product reviews.
 ;
Best help everywhere i got from here. My audio medicinman was happy to get this manual from me. So he could repair my pioneer perfectly. Thanks
R O
;
It was very usefull, it is clear the quality is super, the price I paid is very afordable.
Generally speaking Iam very happy with this company.
;
The manual was exactly what I needed, Good quality scans too. superb.
;
I am so happy found this site as it consists of so many Manuls and easy to aquire. This onei s exactly what I wanted and much more as it has info on not only how to use the tuner but how to repair it as well. I will come here 1st before purchasing else where! Thanks owner-manual.com!
;
Top class product, I printed it out on A3 paper and it is clear and very easy to follow.
Cheaper than buying a new radio!
1-7. Rack Mounting
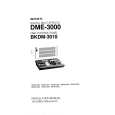
5. For installing the unit in the rack, press the inner members fully to the outer members while pressing the stoppers of the inner members. c � Be sure to mount the unit in the rack with two-person or more. Trying to handle this job by a one-person could lead to injury. � Be careful not to get caught your hand and finger in the rack mount rail when installing the unit in the rack.
Rack
7. After installing the unit in the rack, secure the unit to the rack by the prepared four screws (RK5 X 16) and four washers.
Rack
Washers
RK5 X 16
DME-3000/7000 RK5 X 16 Washers
Outer member Stopper Inner member DME-3000/7000
6. After confirming that the unit can be moved smoothly, tighten the screws (B5 X 8) secured temporarily in the step 4. n When securing the front brackets to the rack by screws, pull out the unit about 20 cm (8 inches) from the rack, and fasten the screws of the front brackets to the rack.
1-13 (E)
|