|
|
|
Categories
|
|
Information
|
|
Featured Product
|
|
|
 |
|
|
There are currently no product reviews.
 ;
The product dowload was delivered efficiently with emails to support its download availabilty. The contets of the manual was very eligible and of good quality. Will purchase from this site again!
 ;
hello this Service Manual PIONER KXE60 is very good, thanks.
;
It was just what I needed. Thanks for your quick action and great price. You guys are top notch.
Thanks
;
Excellent manual, complete, great resolution, easy to read especially the schematics. Thank you !
;
Fast delivery, excellent resolution and complete. And above all, the best price ever !
2-5. Boards Replacement
2-5-4. PSW-61 Board
n When the PSW-61 board is replaced, replace a whole harness (H61) that is connected to PSW-61 board. 1. Disconnect the power cords from the rear panel. 2. Remove the cover. (Refer to Section 2-2-2.) 3. Remove the front panel (lower) and ornamental panel A. (Refer to Section 2-2-1.) 4. Open the front panel A. (Refer to Section 2-4-2.) 5. Remove the power supply units. (Refer to Section 2-42.) When there is one power supply, remove the blank panel. (Refer to Section 2-5-2.) 6. Remove the all HDD units. (Refer to Section 2-4-3.) 7. Remove the front stay. (Refer to Section 2-5-2.) 8. Remove the two power guides. (Refer to Section 2-52.) 9. Remove the IF positioning bracket. (Refer to Section 10. 11. 12. 2-5-2.) Unstick the filter from the front panel A. (Refer to Section 2-4-5.) Remove the LCD case lid. (Refer to Section 2-5-3.) Disconnect the two connectors (CN1, CN4) of the harness connected to the DP-269 board. (Refer to Section 2-5-3.) Remove the DP-269 board. (Refer to Section 2-5-3.) Remove the cable clamp. (Refer to Section 2-5-3.) Remove the PSW-61 board from the front panel A. (Refer to Section 2-5-3.) Cut the two harness clampers.
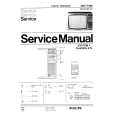
17. Disconnect the two connectors (CN1, CN10) of the harness connected to the AC-188 board . 18. Remove the all optional boards. (Refer to Section 2-55.) 19. Remove the four screws (BVTT 3x6) and two screws (PSW 3x6). 20. Pull out the noise filters until the harness is viewed. n Be sure not to pull out the harness connected to the noise filter. 21. Remove the four connectors of the harness connected to the noise filters. 22. Remove the PSW-61 board connected to the harness (H61).
BVTT 3x6
Noise filters
CN1 PSW 3x6
CN10
13. 14. 15. 16.
AC-188 board PSW-61 board
23. For installation, perform the removal procedures in reverse order. n Use the commercially available harness clamper .
PSW-61 board Harness clampers
MAV-70
2-21 (E)
|
|
|
> |
|