|
|
|
Categories
|
|
Information
|
|
Featured Product
|
|
|
 |
|
|
There are currently no product reviews.
 ;
Excellent, very professional, fast, reliable, congratulations thank you.
;
Excellent printing quality.
A complete and very usefull service manual with all details.
GREAT SERVICE AT VERY LOW PRICE!
A+++++++++++++++++++++++++
;
Excellent printing quality.
A complete and very usefull service manual with all details.
GREAT SERVICE AT VERY LOW PRICE!
A+++++++++++++++++++++++++
;
SATELLIT 4000 GRUNDIG
Service Manual
high quality. good graphics. prompt service.
;
Excellent printing quality.
A complete and very usefull service manual with all details.
GREAT SERVICE AT VERY LOW PRICE!
A+++++++++++++++++++++++++
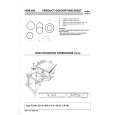
5-5. AT Head Cleaner Replacement
Removal 1. Remove the CL Arm Assembly (1) Turn the M gear of the gear box assembly manually and move the CL arm assembly to the position shown in the figure. n Move the CL arm assembly to the front of the SE-341 board. If not, the CL arm assembly cannot be removed because the stop washer is hidden by other parts. (2) Remove the stop washer at the top of the CL arm assembly. (3) Remove the CL arm assembly from the threading ring. n Do not remove the spring at the bottom of the CL arm from the shaft.
Hole M gear Gear box assembly CL arm assenbly
SE-341 board
CL arm assembly
Stop washer
Installation 2. Attach the CL Arm Assembly (1) Pass a new CL arm assembly through the shaft while hooking the spring as shown in the figure. n Insert the short-end of the spring into the groove of the threading ring and the long-end spring into the hole of the CL arm assembly. (2) Fix the CL arm assembly by new stop washer.
Remove the CL Arm Assembly
SE-341 board Threading ring Shaft Spring
Groove
Stop washer (2.3) : 3-669-596-00
DNW-A100/A50/A45 DNW-A100P/A50P/A45P
5-33
|
|
|
> |
|