|
|
|
Categories
|
|
Information
|
|
Featured Product
|
|
|
 |
|
|
There are currently no product reviews.
 ;
very helpful, the information in these manuels are very detailed
;
Please tell us what you think and share your opinions with others. Be sure to focus your comments on the product. You will receive $2.00 of store credit for Your review.
;
Please tell us what you think and share your opinions with others. Be sure to focus your comments on the product. You will receive $2.00 of store credit for Your review.
;
Good copy and great customer service! There was some confusion with my order and it was resolved promptly!
;
Having bought a pre-owned Sony FM stereo tuner through eBay, it came without any manuals. It soon became clear that to get the best from this excellent tuner I needed a decent manual because much of the operation was not intuitive to a newboy to hi fi like me. I managed to download the official Sony multi-lingual manual from Owner-Manuals.com with no problem at all - a really quick and easy service. I'm very glad I did because I found out all the operations of the tuner and was then able to not only set it up quickly but also to get much more from it that poke-and-hope trialling would ever achieve. In my book $4.99 very well spent.
4gb53171.fm5 Page 13 Wednesday, June 19, 2002 1:14 PM
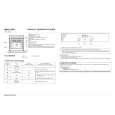
Cleaning the oven and accessories
� When you finish cooking wait for the oven to cool and then clean it to prevent the build-up of baked-on residues. If the food residues are baked on, use a specific oven cleaner and follow the manufacturer's instructions. Dropping the grill element to clean the oven roof (depending on model) � Do not attempt to clean the oven until it is cool. 1. To clean the oven roof, pull out the grill element and lower it as far as it will go. 2. Clean the oven roof and then return the grill element to its original position. Changing the oven lamp 1. Disconnect the oven from the electrical supply. Unscrew the lamp cover. Change the lamp (see N.B.). Refit the lamp cover. Reconnect the electrical supply. Changing the lateral lamp (depending on model) 1. Disconnect the oven from the electrical supply. 2. Remove the left hand side grid. 3. Use a screwdriver to prize off the lamp cover. 4. Change the lamp (see N.B). 5. Reposition the lamp cover and press it against the oven wall until it clicks into place. 6. Refit the side grid. 7. Reconnect the power supply. N.B: Use exclusively 25 W 230 V lamps, type E-14, T300°C, available from After-Sales Service. 2. 3. 4. 5.
�
�
Clean the exterior of the oven with a sponge and warm water. � Do not use abrasive cleaners or pan scourers. � Use a liquid detergent to clean the oven door window. � Wash the accessories in a dishwasher or in the sink, using an oven cleaner. � After the oven has been in prolonged use and when cooking on different levels (especially food with high water contents such as pizzas, stuffed vegetables, etc.) condensation may form on the inside of the door and of the door seal. When the oven is cool, dry any condensation with a cloth or a sponge. Removing the oven door (for cleaning) 1. Open the oven door. 2. Press hinge catches (A) forwards. 3. Lift the catches until they engage and then remove the door. 4. Warning: While you are cleaning the oven, ensure you do not disengage the hinge retainer catches. 5. Refit the oven door by following the above steps in reverse order.
13
|
|
|
> |
|