|
|
|
Categories
|
|
Information
|
|
Featured Product
|
|
|
 |
|
|
There are currently no product reviews.
 ;
Having bought a pre-owned Sony FM stereo tuner through eBay, it came without any manuals. It soon became clear that to get the best from this excellent tuner I needed a decent manual because much of the operation was not intuitive to a newboy to hi fi like me. I managed to download the official Sony multi-lingual manual from Owner-Manuals.com with no problem at all - a really quick and easy service. I'm very glad I did because I found out all the operations of the tuner and was then able to not only set it up quickly but also to get much more from it that poke-and-hope trialling would ever achieve. In my book $4.99 very well spent.
;
This manual is immaculate in it's accuracy. Everything is written very clearly and easy to understand. Written by a professional who wants to convey a clear and easy to understand message!!
;
This Manual (as downloaded) is both informative and comprehensive and has proved to be extremely useful. thoroughly recommended.
;
everything is ok, thank you very much! Product is good, no problems with download!
;
Great site, I always find all the manuals I need and i can't find anywhere else. PDF for the Sony PCM 3348 is complete and scan is good quality. Thank you!
4gb53201.fm5 Page 7 Wednesday, June 19, 2002 2:15 PM
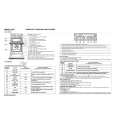
Installation
Technical information for the installer Oven � After removing the oven from its packaging, before making the connections place it on the polystyrene foam base to protect it from damage. Do not attempt to lift the oven by the handle. Lift at the sides as shown in the figure (see arrow). Check that the appliance has not been damaged in transit. Oven dimensions and kitchen unit dimensions are shown in the figure opposite. Kitchen units in contact with the oven must be heat resistant (80° C min). If plastic laminates or cement are not sufficiently heatresistant, warping, bubbling or detachment of the finish may result. � Install the oven in the housing, lifting it at the sides, taking care not to trap the wires of the electrical supply cable. � For correct ventilation, follow the ventilation opening directions shown in the figure � (500 min x 80 mm and 500 min x 50 mm inside the cabinet). � Secure the oven to the kitchen unit with screws (A) as shown. During oven installation, care must be taken to ensure that the sides are not touching the front edges of the housing or adjacent drawers and doors (see picture).
�
�
�
�
�
7
|
|
|
> |
|