|
|
|
Categories
|
|
Information
|
|
Featured Product
|
|
|
 |
|
|
There are currently no product reviews.
 ;
Super nice! Good to have a manual in digital format.
;
Great job supplying the manual.
Many of these products weerepretty obscure, so it was great that you had
the manual for it!
;
Great manual, would not have been able to operate my machine without it!!
James Dawson August 18, 2012
;
excellent value & price! Includes everything you need to know about the NN-C777! I would buy this again.
;
Very satisfied! I was searching for several days, but nope; till I discovered your webside and there it was at a very reasonable price. Keep up the good work!
Paul
Flanders
ENGLISH
DEUTSCH
BN-V856
EXTENDED-USE BATTERY PACK INSTRUCTIONS
BN-V856
LANGZEIT-BATTERIESATZ GEBRAUCHSANLEITUNG
Thank you for purchasing this JVC Extended-Use Battery Pack.
� This is a lithium-ion type battery pack, and is intended for use only with JVC digital video cameras. Do not use it with any other digital video camera. � Before using, be sure to read these instructions carefully to ensure safe use of your new battery pack. For more details, consult your nearest JVC dealer. � Some camcorders do not display the Battery Pack�s remaining power.
Vielen Dank für den Kauf dieses JVC Langzeit-Batteriesatzes.
� Dieser Batteriesatz ist eine Lithium-Ion-Ausführung für JVC Digital-Camcorder. Niemals für einen Camcorder eines Fremdherstellers verwenden! � Bitte lesen Sie diese Anleitung vor der Ingebrauchnahme sorgfältig durch, um den Batteriesatz sachgemä� und betriebssicher zu nutzen. Weitere Informationen erhalten Sie bei Ihrem JVC Fachhändler. � Ihr Camcorder kann ggf. nicht den Ladezustand für diesen Batteriesatz anzeigen.
Cautions
� Use only the AC Power Adapter/Charger designed exclusively for your digital video camera. Use of another battery charger may result in incomplete charging, malfunctions and risk of fire. � Do not incinerate or disassemble; may explode or release toxic chemicals. � Do not short circuit; may cause burns. � When transporting, carry the Battery Pack in a plastic bag. � For more details on handling precautions, use and proper storage of Battery Packs, please refer to your digital video camera's instruction manual.
Sicherheitsma�regeln
� Ausschlie�lich mit dem für Ihren Digital-Camcorder vorgeschriebenen Netzadapter/Batterielader laden. Andernfalls besteht die Möglichkeit von unvollständigen Ladevorgängen, Fehlfunktionen oder Feuergefahr. � Niemals zur Entsorgung verbrennen oder zerlegen. Andernfalls besteht Explosionsgefahr und es können giftige Chemikalien austreten. � Die Batteriepole niemals kurzschlie�en. Andernfalls besteht Verbrennungsgefahr. � Den Batteriesatz stets in seiner Tragetasche transportieren. � Weiter Angaben bezüglich Handhabung, Gebrauch und Aufbewahrung des Batteriesatzes siehe die Benutzerdokumentation des DigitalCamcorders.
Major Specifications
Power requirement, Output Dimensions Weight Operating temperature Storage temperature Charging temperature Operating humidity Charging time (based on room temperature of +10°C to +35°C) 7.2 V, 5600 mAh 86 (W) x 41 (H) x 83 (D) mm Approx. 400 g 0°C to +40°C �10°C to +30°C +10°C to +35°C 35% to 85% Approx. 6.5 hours Provided accessories Continuous shooting time (based on room temperature of +20°C) �GR-DVL9000 when using the viewfinder: Approx. 6 hours when using the LCD monitor: Approx. 5 hours �GR-DVM1: Approx. 4.5 hours Battery Pack, Battery Pouch (shoulder strap included)
Technische Daten
Leistungsaufnahme, Spannungsabgabe Abmessungen Gewicht Betriebstemperatur Lagerungstemperatur Ladebetriebstemperatur Betriebsluftfeuchtigkeit Ladedauer (bei +10°C bis +35°C Umgebungstemperatur) 5600 mAh, 7,2 V Gleichspannung 86 (B) x 41 (H) x 83 (T) mm Ca. 400 g 0°C bis +40°C �10°C bis +30°C +10°C bis +35°C 35% bis 85% Ca. 6,5 Std. Mitgeliefertes Zubehör Kontinuierliche Nutzungsdauer (+20°C Umgebungstemperatur) � GR-DVL9000 mit Sucherbildüberwachung: Ca. 6 Std. mit LCD-Monitor-Bildüberwachung: Ca. 5 Std. � GR-DVM1: Ca. 4,5 Std. Batteriesatz, Tragetasche (mit Schultergurt)
E. O. E. Design and specifications subject to change without notice.
Irrtümer sowie �nderungen der Konstruktion und der technischen Daten vorbehalten.
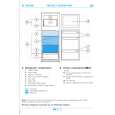
Charging and Installing the Battery Pack
To charge the Battery Pack, your digital video camera�s AC Power Adapter/Charger (AA-V80) is required. Note that it is also possible to charge a Battery Pack that has not been completely exhausted. BN-V856 To AC outlet
So laden und verwenden Sie den Batteriesatz
Zum Laden ist der Netzadapter/Batterielader (AA-V80) Ihres Digital-Camcorders erforderlich. Sie können einen Batteriesatz aufladen, selbst wenn dieser nicht vollständig entladen ist.
1
Battery Pack
Attach the Battery pouch to your belt or hang it from your shoulder and start shooting.
An Netzsteckdose
Batteriesatz BN-V856
Bringen Sie die Tragetasche an
Netzkabel
1
Ihrem Gürtel an oder verwenden Sie den Schultergurt.
Charger Indicator 1 Power Lamp Charger Indicator 2 AA-V80 AC Power Adapter/Charger
Ladeanzeige 1 Betriebsanzeige Ladeanzeige 2
2
Power Cord
2
Netzadapter/ Batterielader (AA-V80)
1 Plug your digital video camera�s AC Power Adapter/Charger's Power Cord
into an AC outlet.
1 2
Install the Battery Pack in the Battery Pouch. Connect the DC Cord to the Battery Pack and the camcorder. Use only the DC Cord provided with the AC Power Adapter/Charger.
1 2
2 Attach the Battery Pack to the AC Power Adapter/Charger.
Schlie�en Sie das Netzkabel des Netzadapter/Batterieladers an einer Netzsteckdose an. Schieben Sie den Batteriesatz am Netzadapter/Batterielader auf. � Nur die Ladeanzeige 1 beginnt zu blinken. Ladeanzeige 2 arbeitet nicht. � Nach vollständig ausgeführtem Ladevorgang wechselt das Blink- auf ein Dauerleuchtsignal.
1 2
Setzen Sie den Batteriesatz in die Tragetasche ein. Verbinden Sie Batteriesatz und Digital-Camcorder mit dem Gleichspannungskabel. Verwenden Sie ausschlie�lich das zum Netzadapter/Batterielader mitgelieferte Gleichspannungskabel.
� Charger Indicator 1 starts to blink. Charger Indicator 2 does not blink. � The Charger Indicator stops blinking but stays lit to indicate charging has finished.
0398TGV UN SW LYT0174-002A
**
|
|
|
> |
|